
MANUALS
Talisman: Digital Edition is based on the 4th Revised Edition of Talisman made by Fantasy Flight Games. Slight tweaks have been made to the rules in order to keep the gameplay of the digital version smooth and also to clarify rules areas which were unclear or conflicted.
This rulebook can be used for both the digital version and the physical board game.
If you’re still stuck, you can also join our official Nomad Games discord, full of expert Talisman players who are always happy to help.
Table of Contents
Introduction
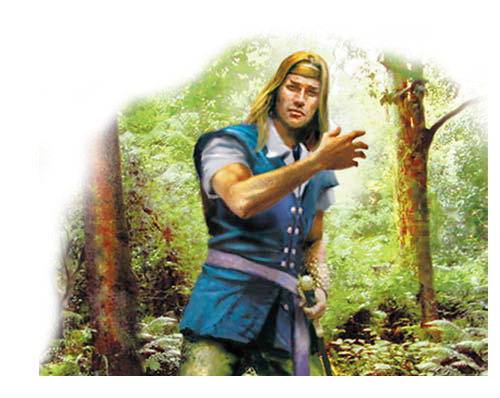
Our story begins with a mighty wizard, now long dead, who once ruled over the land of Talisman using the power of a magical crown, forged in the Valley of Fire by spirits cruelly enslaved to arcane magic. For many centuries the wizard reigned supreme until, after a long life spent amongst his books and spells, he sensed his days were drawing to an end. He resolved to hide his crown in the most perilous part of the most dangerous region in his realm, setting around it such fearsome guardians as his most powerful spells were able to command. Once he had done so, he perished, proclaiming with his dying breath that only a champion with the strength, wisdom, and courage to take his crown would rule in his stead.
Hundreds of years have passed, and the realm, long ungoverned and unprotected, has grown ever more dangerous, becoming infested by monsters and troubled by innumerable evils. To this very day, the ancient legend draws gallant heroes to the troubled land – each seeking the Crown of Command and the kingship of the realm of Talisman. So far no one has proven worthy of the challenge. The seekers’ bones lie bleached and broken upon the Plain of Peril or else cast idly aside to be gnawed by wild beasts and monsters.
In Talisman, up to six players assume the roles of hopeful characters–the would-be rulers of the land of Talisman. Each character is very different and has his own strengths, weaknesses, and special powers. To win the game you must journey to the heart of the land’s most perilous region to find the Crown of Command and use its ancient magic to cast a mighty spell to subdue all your rivals.
Your travels will be hard and fraught with danger. Only by gradually building up your adventurer’s powers, gathering valuable allies, and winning potent magical items will you stand a chance of surviving the ultimate test that lies beyond the Portal of Power.
Object of the Game
In the base game, the main goal is to reach the Crown of Command in the centre of the board and then, by casting Command Spells, force the other characters out of the game. Characters should first adventure in the Outer and Middle Regions to build up their Strength, Craft, and lives, until they feel they are powerful enough to tackle the Inner Region. They must also first find a Talisman to permit them to enter the Valley of Fire and so reach the Crown of Command.
With expansions included and various house rules switched on, the main goal can change and is often determined before the game starts. To check the current ending during a game, select the Crown of Command space on the board and you will see the current ending card, unless the Hidden Endings rule is in play.
Number of Players
Up to six players can play a game of Talisman, but the more players that are participating, the longer the game will last. One player can play against up to 5 AI players and six human players can play against each other online.
There are some house rules designed to speed up the game. These are found in the House Rules section of the game setup.
Component Overview
Here is a brief description of the game components.
Game Boards

The main game boards (base and Cataclysm) depict the magical land of Talisman. They are divided into three Regions (Outer, Middle, and Inner Region).
Some expansions add extra regions around the outside of the base board.
Adventure Cards

This deck contains the many creatures, events, and items that characters discover on their quest through the outer and middle Regions.

Spell Cards
Spell Cards detailing the various Spells that may be cast during the game.
Counters
These are used to keep track of the characters' Strength (red), Craft (blue), and lives (green). Each small counter is worth one point, and each large counter is worth five points. Different-sized counters of the same colour can be traded for equivalent values at any time (i.e., a player can swap five small red counters for one large red counter, or ice versa, but cannot swap green counters for red ones, etc.).


Fate Tokens
Each token has a light and dark side. Fate can be used to re-roll a die at a key moment.

Alternative Ending Cards
Alternative Ending Cards provide new goals for the players and can replace the original base game ending. These can be revealed at the beginning of the game, or hidden until a player reaches the Crown of Command.

Purchase Cards
These are cards that characters may obtain by means other than the Adventure Cards.

Talisman Cards
Characters may discover Talismans in the Adventure deck or by completing a quest at the Warlock’s Cave space.

Character Cards
Character cards each detail a different character and his special abilities.

Character Figures
Each character card corresponds to a figure that is used to represent that character on the board.
Toad Character Cards and Figures

Toad Cards and Toad figures are used when a character is turned into a Toad during the game. When this happens, a Toad Card is used instead of the original character card and a Toad figure is substituted for that character’s figure for the duration of being a Toad.
Board Overlays
The Dragon expansion comes with a new overlay that replaces the base game's Inner Region. The Dragon Realm is featured on one side and the Dragon Tower is featured on the other side.


Expansion Regions
The City, The Dungeon, The Highland and The Woodland all come with extra regions which fit around the four corners of the original base board.

The City (top-left), The Dungeon (top-right), The Highland (bottom-left) and The Woodland (bottom-right)
Each expansion has its own set of cards, characters and special rules which will be explained in more detail below.
Game Setup
Skip to physical board game setup
Digital Edition setup
1. Choose Play from the main menu
2. Choose New Game or resume a previously saved game

3. Game setup is spread across three screens. Move between the screens by choosing the Characters, Expansions and House Rules tabs across the bottom.
4. On the Characters screen, you can use the minus buttons on the left to remove player slots and reduce the number of characters in the game.
5. You can choose the ? icon to view a list of all of the available characters (depending on which expansions are currently selected). You can select a character to use in the game here.
6. Switch between an AI Player and a Local Player by clicking the buttons which say 'AI Player' on them. In an Online Game setup, these slots will be either Human or AI Players.

7. Press the Expansions button to move to the next setup screen.
8. This screen shows you a list of all of the expansions for the game. Any expansions you own can be switched on here by pressing the 'tick' buttons.
9. You can choose to not use characters from an expansion whilst still using the rest of the expansion content. In this screenshot, The Reaper, The Dungeon and The Highland are all ticked and ready to use, but the characters from The Highland will be excluded from this game.
10. Select the dice icon to randomise the content for the game.

11. Press the House Rules button to switch to the third tab.
12. From this screen, you can select from a list of House Rules to tailor your game to how you wish to play.
13. Toggle rules on or off until you have the setup you want to play. Some rules require other setup options to be enabled in order for them to be switched on.
14. If you have enabled an expansion which has alternative endings, you can choose which of them to be included in the game by pressing the Alternate Endings button on this screen. Toggle them On (Green) or Off (Red).
15. When you have the game setup you want, choose the Start Game option to launch the game.
Physical Setup -
1. One player takes the character cards, shuffles them, and deals one, facedown, to each player. (Alternative rule: If all players agree, players who want more selection may be dealt three character cards each, and then choose which one of those three characters they wish play. The other characters not chosen are returned to the box and maybe available if a character is killed.
2. The board is unfolded and placed in the center of the playing area. Randomly choose if the Dragon board will be used if the Dragon expansion is being used, and which side if so.
3. If using NPCs: At the start of the game, place the Harbinger figure on the Harbinger sheet, the Werewolf figure on the Forest space, and the Grim Reaper figure on the Portal of Power space.
4. Roll a die to determine if the ending will be Revealed or Hidden. On a 1-3 roll the Ending is Hidden. On a 4-6 roll the ending is Revealed. After rolling, remove the unused Hidden or Revealed Ending cards from the Ending deck and shuffle the deck. Draw one Ending card and place it on the Crown of Command space. Facedown if Hidden, faceup if Revealed.
5. If using the Harbinger expansion: Lay out the four stacks of Omen cards and roll a die to select which stack will be used. Use 1-4 from left to right, rerolling 5 and 6. Collect all eight Omen cards belonging to the selected Omen set. Then use them to make a faceup stack, starting with the 7th Omen at the bottom, then the 6th Omen, 5th Omen, etc., with the Prophecy card on the top. The stack is then placed next to the Harbinger sheet.
6. If using the Blood Moon expansion: Place the Time Card next to the game board with the Day side showing faceup.
7. If using the City expansion: Draw three Wanted Poster cards and place them faceup on the City Gate space.
8. If using the Woodland expansion: Draw three Path Cards and place them faceup next to the Woodland entrance.
9. The various Region decks are shuffled and placed facedown beside the board. These form the Adventure decks.
10. The Spell Cards are shuffled and placed facedown beside the board. These form the Spell deck.
11. The Talisman and Purchase Cards are placed facedown beside the board.
12. If using the City expansion: Shuffle the Potion and Pet decks. Then, place the Potion, Magic Emporium, Armoury, Pet, and Stables decks facedown beside their corresponding spaces on the City board.
13. Each player places his character card faceup in front of him. This card is the character the player will play during the game. A player’s character card, Objects, Followers, counters, and other game components form his play area.
14. Each player takes the plastic character figure corresponding to his character card and places it on the board according to the start space given on his character card.
15. Each player receives a number of life counters equal to the life value listed on his character card and a number of fate tokens equal the fate value listed on his character card. Players also each receive one gold. Life, fate, and gold should all be placed in the appropriate spots next to each character card. The remaining counters, tokens, and gold are placed to one side as stockpiles for use during the game.
16. Any player whose character starts the game with any Spells, as detailed in the character’s special abilities, draws the designated number of Spell Cards from the Spell deck. These should not be revealed to other players.
17. Any player whose character starts the game with any Objects, as detailed in the character’s special abilities, now takes the designated Object Cards from the Purchase deck.
18. The Toad and Alignment Cards should be kept handy, to be used when required.
19. Players roll to determine who takes the first turn. Play then proceeds round the board clockwise from that player.
Character Cards
Characters are at the core of the experience of playing Talisman. It is through a player's character the he interacts with the game board, travels to new Regions, attacks creatures, and gains Objects, Followers, and powerful Spells. Each player's character card lists his character's Strength, Craft, fate, and life values, as well as a number of special abilities.
Strength
Strength represents a character’s might, stamina, and fighting ability. It is used in battle and to overcome certain obstacles that may be encountered during the game. When a character gains Strength, this increase is recorded by placing additional Strength counters (red cones) beside the character card.
Strength counters are only taken for Strength points gained during play. Strength gained from Objects, Magic Objects, or Followers is not recorded by Strength counters but is added to the character’s Strength when required or allowed.
A character’s Strength at any time is the character’s Strength value, plus Strength counters, plus any Strength gained from Followers, Magic Objects, and Objects that may be used at that time.
When a character is required to lose Strength, counters are removed accordingly and returned to their stockpile.
A character’s Strength can never drop below that character’s Strength value (i.e., the number printed on the character card).
This is an important rule and is often missed - Strength Value is the number printed on the character sheet, whereas a character's current Strength is their Strength Value plus modifiers from traded trophies, Objects, Followers, etc.
Example of a Character's Strength

The Warrior (Strength value of 4) has a total of 2 Strength counters, the Magic Belt (a Magic Object that increases Strength by 1), the Unicorn (a Follower that increases Strength by 1), and a Sword (an Object that increases Strength by 1 during battle only).
His total Strength is 8 (4 Strength value, plus 2 Strength counters, plus 1 each for the Unicorn and for the Magic Belt). In battle his Strength is 9 since he can use the Sword.
During play, he lands on the Cursed Glade, where Strength from Objects and Magic Objects cannot be counted. While he is there, his Strength is 7 (4 Strength value, plus 2 Strength counters, plus 1 for the Unicorn), even during battle.
Craft
Craft represents a character’s intelligence, wisdom, and magical ability. It is a character’s main asset in psychic
combat and determines how many Spells he may have. When a character gains Craft, this increase is recorded by placing additional Craft counters (blue cones) beside the character card.
Craft counters are only taken for Craft points gained during play. Craft gained from Objects, Magic Objects, or Followers is not recorded by Craft counters but is added to the character’s Craft when required or allowed.
A character’s Craft at any time is the character’s Craft value, plus Craft counters, plus any Craft gained from Followers, Magic Objects, and Objects that may be used at that time.
When a character is required to lose Craft, counters are removed accordingly and returned to their stockpile.
A character’s Craft can never drop below that character’s Craft value (i.e., the number printed on the Character card).
This is an important rule and is often missed - Craft Value is the number printed on the character sheet, whereas a character's current Craft is their Craft Value plus modifiers from traded trophies, Objects, Followers, etc.
Lives
Lives represent the character’s durability. Lives are lost through battle, psychic combat, and other dangers that are encountered. A character’s lives are recorded by placing appropriate life counters (green cones) beside the character card. Characters may replenish lost lives by healing or gaining life.
Each character starts the game with a number of lives equal to the life value listed on his character card.
Losing Lives
When a character is required to lose lives, counters are removed accordingly and returned to their stockpile.
Losing All Lives
Any character who loses all of his lives is immediately killed. All the character’s Objects, Magic Objects, Followers, and gold are placed on the space where the character was killed. All the character’s Strength and Craft counters and fate tokens are returned to their stockpiles. The character’s Spell Cards are placed on the Spell Card discard pile. Other cards (including the character’s trophies) and counters are placed in the appropriate stock or discard piles. The character card and character figure are removed from the game.
The dead character’s player may start again, on his next turn, with a new character drawn at random from the unused character cards. Players may start new characters if, and only if, no character has yet reached the Crown of Command during the game. If any character has reached the Crown of Command, a player whose character is killed is out of the game.
Healing and Gaining Lives
Healing can never replenish a character to more than his life value.
A character can gain lives (as apposed to heal) over and above his life value.
Fate

Fate Tokens
Each character starts the game with a number of fate tokens equal to the fate value listed on his character card. If the Woodland expansion is in play, he chooses whether each of his starting fate is either dark fate or light fate.
Fate is a measure of a character's luck and fortune. Once per die roll, a player may spend one fate token to reroll one die that a character just rolled under the following circumstances:
A die rolled for a character's movement
Rolling a die to determine his character's attack roll.
Rolling a die due to the instructions on a card or board space.
Woodland: A player may only spend dark fate to reroll a die that another character just rolled. The player who just made a roll has the option to spend light fate to reroll his own die before another player can spend dark fate to force him to reroll his die. Fate placed on a card is considered to be a token and counts as neither light nor dark fate while it is on a card. If fate on a card is either gained or spent, it may be gained or spent as either light or dark fate.
If a player rerolls a die because a fate was spent, he must accept the new result. Another fate (light or dark) cannot be spent to reroll the same die again. If a player rolls multiple dice (for example, the Dice with Death space in the Inner Region), fate (light or dark) can be spent to only reroll one of them.
A player may not pay fate tokens to reroll a die used to determine a creature’s attack roll or to reroll another player’s die roll.
Replenishing and Gaining Fate
A character may only replenish fate up to his fate value. However, if a character gains fate, he may take
fate tokens over and above his fate value. When a character gains or replenishes fate, he must choose
to place that fate with either its light side or dark side faceup. If he gains or replenishes light fate, he must
place the fate with its light side faceup. If he gains or replenishes dark fate, he must place the fate with its
dark side faceup.
Fatebound (The Woodland)

1. Lightbound 2. Darkbound
Some cards possess fatebound effects which affect characters differently depending on whether a character is lightbound, darkbound, unbound, or fateless.
A fatebound effect is the text on a card placed after either the lightbound or darkbound symbol.
A character is lightbound if he has more light fate than dark fate. A lightbound character must resolve the lightbound effects on cards he encounters, and can only resolve the lightbound effect on his Objects,
Followers, and Spells. He cannot resolve darkbound effects.
A character is darkbound if he has more dark fate than light fate. A darkbound character must resolve the darkbound effects on cards he encounters, and can only resolve the darkbound effects on his Objects,
Followers, and Spells. He cannot resolve lightbound effects.
A character is unbound if he has an equal amount of light fate and dark fate. An unbound character ignores all fatebound effects and cannot resolve the fatebound effects on his Objects, Followers, or Spells.
A character is fateless if he has no fate. A fateless character must resolve the lower fatebound effect on
cards he encounters and cannot resolve the fatebound effects on his Objects, Followers, or Spells.
Fatebound effects on Events, Enemies, Strangers, and Places are resolved when the card in encountered,
unless otherwise stated. Fatebound effects on Objects, Followers, and Spells are resolved as directed by the card.
Special Abilities
Each character has one or more special abilities, which are detailed on the character card.
Start Space
A character's start space is the space which he begins the game on. A character's start space is listed on the bottom of his character card next to his alignment.
Adventure Cards
Most of the spaces on the Talisman board instruct players to draw one or more Adventure Cards. When drawn, Adventure Cards are taken from the top of the Adventure deck and placed, faceup, in the space where they are encountered.
When characters in any expansion Region are instructed to draw cards, they always draw Cards respective to that
expansion, rather than Adventure Cards. This requirement is true even when, for example, cards and special abilities specifically instruct the player to draw one or more “Adventure Cards.”
When a card is encountered in an expansion Region and has instructions or effects that refer to Adventure Cards, it affects that Region's cards instead.
Example: The Astrologer instructs a character to draw 3 Adventure Cards. If the Astrologer is encountered in the Outer or Middle Region, the character must draw from the base game’s Adventure deck. However, if the Astrologer is encountered in the Highland Region, the character must draw from the Highland deck instead of the Adventure deck.
Special Abilities Involving Adventure Cards in an Expansion Region
Special abilities and effects that apply to Adventure Cards behave differently when characters are in the Deep Realm, City, Highland, Woodland, and Dungeon Regions rather than the Outer, Middle, or Inner Regions. When used within these Regions, these special abilities and effects apply to cards from the respective Regions deck instead.
Example: The Prophetess’ special ability states that whenever she draws Adventure Cards, she may discard one card of her choice and draw one more card to replace it. While the Prophetess is in the Outer or Middle Region, her ability applies to cards from the Adventure deck. However, while she is in the Highland Region, her ability applies to cards from the Highland deck instead.
If there are any Adventure Cards already in a space a character lands in, his player draws only enough new cards to take the total to the number indicated for the space. For example, if a space instruction reads “Draw 2 Cards,” but there is already one card there, then the player only draws one new card to bring the total to two cards.
Adventure Cards should be dealt with in the order determined by their encounter number (the number at the bottom right corner of the card in the physical game, centre-right in the digital game).
The lowest number is tackled first, then the next lowest, and so on. In the case of a tie, the character encounters Adventure Cards in the order they were drawn.
One exception to the rule about resolving Adventure Cards in encounter number order is that Adventure Cards with instructions that result in their being placed in a space other than the one where they were drawn are dealt with first, before any other Adventure Cards are resolved. If placed elsewhere, an Adventure Card does not affect the character who drew it at that time.
Types of Adventure Cards
The different types of Adventure Cards and their effects are listed below. Keep in mind that Adventure Cards must be encountered in encounter number order, so only after Events and Enemies are dealt with may the more frequently beneficial cards be encountered.
Enemy - Animal, Dragon, Monster, etc.
These Enemies attack any character encountering them by battling the character. Killed Enemies of this type may be kept as trophies to be exchanged for Strength. Enemies that defeat characters remain in the space.
Enemy - Spirit, Elemental, etc.
These Enemies attack any character encountering them by engaging that character in psychic combat. Killed Enemies of this type may be kept as trophies to be exchanged for Craft. Enemies that defeat characters remain in the space.
Strength/Craft
Many Enemies possess a Strength/Craft value. If a character encounters these Enemies, he can choose to fight these Enemies in either battle or in psychic combat. Characters may exchange trophies with a Strength/Craft value for either Strength counters or Craft counters.
Places
The instructions on the card must be followed. Some Places require characters to roll a die to see what they encounter, while other Places reward characters each time they visit.
Events
The instructions on the card must be followed. Any instructions that result in the loss of a turn by the character encountering the card ends the character’s turn immediately. This counts as a missed turn for that character if there are other cards to be encountered; otherwise, he misses his next turn instead.
Objects, Magic Objects and Followers
These may be taken to the character’s play area, if permissible, and when all Enemies on the space have been killed or evaded.
Strangers
The instructions on Stranger cards must be followed. Strangers have various effects on characters that encounter them, and some-times their reaction is based on the character's alignment.
Burning Cards (Firelands Expansion)
Burn is an effect that represents the complete incineration of part of the Talisman world. If a player is instructed to burn a card, he removes it from the game and places it in the game box (removed completely in the digital game). That card is then classed as a Burnt Card; game effects do not interact with burnt cards unless specifically stated.
Fireproof
Some cards are immune to the ravages of flame and cannot become burnt cards. These cards possess the fireproof symbol. Cards with the fireproof symbol are not affected by burn effects. If an effect causes a player to burn a card, he cannot choose a card that has the fireproof symbol. If all cards have a fireproof symbol, then nothing happens. If an effect causes a player to burn a number of cards from a deck, he reveals that many cards from the top of the deck, sets aside all cards with the fireproof symbol, and burns all the remaining cards. Then, he shuffles all the cards he set aside and places them back on top of the deck.
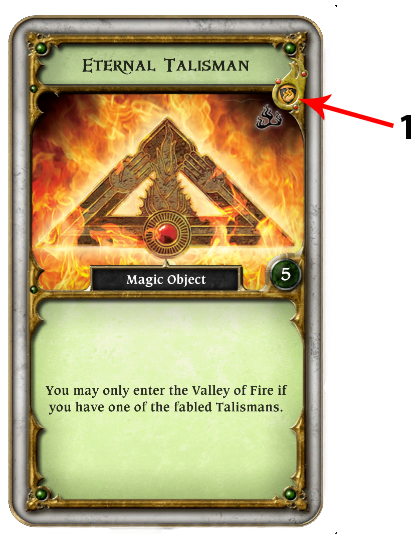
1. Fireproof symbol
The Game Turn
On their game turns, characters move around the board, usually by the roll of the die but sometimes by the use of
Spells or due to strange beings or places that they have discovered.
Having moved, characters can then encounter another character in the space they land on or follow the instructions on the space. The instructions are often to draw Adventure Cards. These cards depict the Objects, Enemies, and other things that the character meets in the space.
Gradually characters will become more powerful, until they feel that they are strong enough to head for the centre of the board and attempt to reach the Crown of Command.
More specifically, each player’s turn consists of two parts, in this order:
Movement - The player rolls a die and move his character that number of spaces around the board.
Encounters - Once a character has finished his move, he must encounter either the space or a character in the space where he lands.
Dragon Expansion - before a player rolls for his move he draws a Dragon Token.
If either the Reaper or Blood Moon expansions are in use and the player rolls a 1 for his move, he completes his turn as normal, but then he must roll the die again and move the Werewolf figure, and then roll again to move the Reaper figure. In the digital version, you can choose which of these to do first.
If the Blood Moon expansion is in play and a character draws an Event, the player must flip the Time Card over to the other side before encountering any cards.
If the Harbinger expansion is in play and a character draws an Event card, move the Harbinger to that character's space. Whenever a character in the same Region as the Harbinger is instructed by a board space to draw cards, he must draw Harbinger cards instead. If the Dragon Expansion is in play and character chooses to encounter a dragon scale instead, he draws from the dragon deck.
At the end of a character's turn, play passes clockwise to the player on the left. In the digital version, play moves downwards to the next player.
Time Card (Blood Moon Expansion)

Day Side Night Side
The Time Card represents the passage of time and indicates whether the current state of the game is Day or the Night. Creatures receive bonuses or penalties to their attack scores depending on whether they are attacked during the Day or Night. Some Adventure and Spell Cards also have different effects or react to characters differently during the Day or the Night.
Whenever a character draws one or more Events during his turn, before he encounters any cards, he must flip the
Time Card over to the other side. Daybreak occurs when the Time Card is flipped to the Day side. Nightfall occurs
when the Time Card is flipped to the Night side.
During the Day, each creature subtracts 1 from its attack score during battle and psychic combat (to a minimum of 1). During the Night, each creature adds 1 to its attack score during battle and psychic combat. If a character fights two or more Enemies at the same time, each Enemy subtracts or adds 1 to the attack score depending on whether it is Day or Night.
Lunar Events
Some of the Adventure Cards included with the Blood Moon expansion feature a card type called Lunar Events. Lunar Events are treated in all respects like normal Events except that they use a couple of additional rules, as described below:
Instead of requiring players to flip the Time Card over to its other side, each Lunar Event indicates which side the Time Card must be flipped to.
Players do not place Lunar Events on the game board. Instead, Lunar Events are placed next to the Time Card and remain in play until the Time Card is flipped over. This may result in multiple Lunar Events being in play at the same time.
Dragon Tokens (Dragon Expansion)
At the start of each player’s turn, he must draw one dragon token at random from the pool and resolve its effect. After the effect of the dragon token is resolved, the player continues his turn as normal. The effects of the various dragon tokens fall into two different types: Special Effects and Dragon Scales.
Dragon Strike

Dragon Strike
The character who drew the token immediately draws two additional dragon tokens from the pool and resolves them in the order in which they were drawn. If additional Dragon Strikes are drawn, the character must continue to draw additional dragon tokens. After the Dragon Strike is resolved, it is discarded.
Dragon Rage

Dragon Rage
The character who drew the token suffers the Dragon Rage of the current Dragon King. These effects are explained in more detail below. After the Dragon Rage is resolved, it is discarded.
Dragon Slumber

Dragon Slumber
The character who drew the token places a sleep token on one Dragon of his choice in any Region. If there are no Dragons on the board, he may place the token on any Enemy of his choice. If there are no Enemies on the board, the Dragon Slumber has no effect. After the Dragon Slumber is resolved, it is discarded.
When a character encounters an Enemy with a sleep token on it, the Enemy’s Strength and Craft are both reduced by 3 points, to a minimum of 1.
Dragon Scales
The effects of dragon scales vary depending on whether they are placed on a Draconic Lord, the game board, or a character’s play area.

Red - Varthrax Dragon Scale, Yellow - Cadorus Dragon Scale, Green - Grilipus Dragon Scale
When a dragon scale is first drawn, it is placed on the matching Draconic Lord Card. The number of dragon scales on a Draconic Lord indicates how close he is to becoming the next Dragon King (see “Crowning the Dragon King”, below).
When a dragon scale is placed on the game board, characters may have to draw Dragon Cards when they encounter it on the space (see “Encountering Dragon Scales”, below).
When a dragon scale is placed in a character’s play area, the character gains a bonus to his attack score for each dragon scale that matches his opponent (see “Claiming Dragon Scales”, below).
Crowning The Dragon King
When a character draws a dragon scale, it is placed on the matching Draconic Lord Card. When the third dragon scale is placed on a Draconic Lord, he is immediately crowned the new Dragon King and the Crown token is placed on his card as a reminder of his status.
The character then takes one dragon scale from the Dragon King’s card and places it on the character’s space. If the space already has a dragon scale, it is placed in the next space counterclockwise that does not already have a dragon scale. If every space in the Region already has a dragon scale, the dragon scale is discarded and the character must suffer the Dragon Rage of the Dragon King instead. The two remaining dragon scales on the Dragon King’s card are discarded, and the character continues his turn as normal.
In this manner, the Dragon King changes throughout the game and spawns Varthrax, Cadorus, and Grilipus dragon scales on board spaces.
Important: Characters in the Inner Region do not place a dragon scale on their space; all three dragon scales on the Dragon King’s card are discarded instead.
Encountering Dragon Scales
During the course of the game, dragon scales are placed on the board when Draconic Lords are crowned the Dragon King and as a result of various cards. If a character lands in a space that has a dragon scale, he may either encounter the space, a character in the space, or the dragon scale in the space.
Exception: When a character lands on a space with a dragon scale that matches the current Dragon King, that
dragon scale must be encountered.
If a character encounters the dragon scale, he must draw one card from the deck that matches the dragon scale, even if there are already one or more cards in the space. The character must resolve all of the cards in the space following the normal rules (cards must be resolved in order of their encounter number, Enemies with the same encounter number add their Strength and Craft together, etc.). This may result in a character resolving an Adventure Card from the main game before he resolves the newly drawn card if the Dragon Card has a higher encounter number.
When a character encounters a dragon scale, all of the instructions on the space are ignored. In other words, the text on the space has no effect on the character or cards whatsoever. This can dramatically change the Regions, as dragon scales can potentially prevent characters from purchasing items in the Village, praying at the Temple, or healing at the Doctor.
If the Sentinel has a dragon scale that matches the Dragon King, characters may not use the space to cross to the Middle Region, but they may freely cross from the Middle Region to the Outer Region.
If the Portal of Power has a dragon scale that matches the Dragon King, characters may not use the space to cross to the Inner Region, but they may freely cross from the Inner Region to the Middle Region.
Claiming Dragon Scales
If a character kills an Enemy from a Dragon Card, in addition to taking the Enemy as a trophy, he may claim the dragon scale on his space and place it in his play area. Dragon scales have two powerful effects:
If a character encounters an Enemy or Draconic Lord, each dragon scale the character has that matches his opponent adds one point to his attack score.
If a character is about to suffer a Draconic Lord’s Dragon Rage (see “Dragon Rage” below), he may discard one of his dragon scales that matches the Draconic Lord to cancel the Dragon Rage and not suffer any of the effects.
Characters may gain any number of dragon scales during the game. Dragon scales are not considered Objects, Spells, or Followers. Therefore, they cannot be ditched, stolen, sold, or traded. If a character is killed, all of his dragon scales are inherited by the player’s new character.
Dragon Scales and Multiple Enemies
If a character resolves a battle or psychic combat with more than one Enemy at the same time, each dragon scale that matches an Enemy adds one point to his attack score.
Example: A character attacks two Enemies from the Varthrax deck with the same encounter number. The character has three dragon scales that match Varthrax, so he adds a total of six points to his attack score.
Dragon Rage
Each of the three Draconic Lords features a Dragon Rage effect: Varthrax forces characters to discard a Follower,
Cadorus forces characters to discard an Object, and Grilipus forces characters to discard a Spell.
If a character does not have the required card to discard, he loses one life instead. If a character has a dragon scale that matches the Draconic Lord, he may discard the dragon scale to cancel the Dragon Rage and not suffer any of the effects (see “Claiming Dragon Scales” above).
Sleep Tokens

Sleep Token
Characters may have the opportunity to place sleep tokens on Enemies during the course of the game. When a character encounters an Enemy with a sleep token on it, the Enemy’s Strength and Craft are both reduced by 3 points, to a minimum of 1.
An Enemy can only have one sleep token placed on it at a time. For example, two sleep tokens cannot be placed on an Enemy to reduce its Strength by 6 points.
If a character encounters a sleeping Enemy, its sleep token is returned to the pool at the end of the turn, regardless of whether the Enemy was killed or the character was defeated. Killing a sleeping Enemy does not reduce its points as a trophy – the Enemy is worth the full value printed on its card.
Drawing from the Dragon King's Deck
When characters are instructed to draw cards from the Dragon King’s deck, the cards must be drawn from the
deck that matches the Draconic Lord who is the current Dragon King.
Breath Attacks
Some Dragons make a breath attack before the character’s attack is resolved. If a character suffers the effects of a breath attack, he must still resolve the battle or psychic combat unless specifically stated otherwise.
If a character has a Spell or ability that is used when he is about to engage in battle or psychic combat, it is implemented before the breath attack is resolved.
If a character evades the Dragon, he does not resolve the Dragon’s breath attack.
Special Abilities Involving Dragon Cards
Special abilities and effects that apply to Adventure Cards also apply to Dragon Cards but only after they have been drawn and placed on the board.
Example: The Prophetess’ special ability states that whenever she draws Adventure Cards, she may discard one card of her choice and draw one more card to replace it. The Prophetess may not use her ability when she draws Dragon Cards.
Example: A character lands on a space with a Dragon Card and casts the Destruction Spell. The Spell’s effect allows him to remove any faceup Adventure Card from the board and place it on the discard pile. The character may cast Destruction on the Dragon Card because it has already been drawn and placed on the board.
Discarding Dragon Tokens
When dragon tokens are discarded, they are removed from the game and returned to the box. If every dragon token is taken from the pool, return all of the dragon tokens that were removed from the game (including any discarded dragon scales) back to the pool facedown and randomize them to form a new pool.
Discarding Cards
If an effect such as suffering the Dragon Rage of the Dragon King forces a character to discard Objects, Followers or Spells, the character chooses which card to discard unless the effect specifically states otherwise.
The Harbinger
The Harbinger is the bearer of an ancient prophecy who has arrived to foretell the end of the world.
Whenever the top Omen is discarded, move the Harbinger figure to the Harbinger sheet after the next Omen in the stack is resolved.
A character landing on the same space as the Harbinger must encounter the Harbinger by rolling on his chart instead of encountering the space, a non-king Dragon Scale, or another character on the space.
Harbinger Cards
Harbinger cards do not count as Adventure cards while being drawn and cannot be affected by the Orb of Knowledge, the Prophetess’ ability, or similar effects.
Once a Harbinger card has been placed faceup on a space, it is treated as an Adventure card.
Enemies from the Harbinger deck must be taken as trophies when defeated in battle or psychic combat.
Omen Cards
As the apocalypse looms over the world of Talisman, signs appear and prophecies are fulfilled, warning that the end is nigh. The Omen cards reveal the greatest of these signs.
Before the game begins, players must first decide which Omen set they wish to use. Collect all eight Omen cards belonging to that Omen set. Then use them to make a faceup stack, starting with the 7th Omen at the bottom, then the 6th Omen, 5th Omen, etc., with the Prophecy card on the top. The stack is then placed next to the Harbinger sheet.
When an effect causes the top card of the Omen stack to be discarded, take the top card of the Omen stack and place it faceup on top of the Omen discard pile. Then resolve any immediate effects on the newly revealed Omen card. If there are no cards remaining in the Omen stack, the game is over and all characters lose the game.
If an effect places an Omen card in the Omen discard pile on top of the Omen stack, resolve any immediate effects on the newly placed card.
Continuous effects of the top Omen card of the Omen stack are always applied until the Omen is discarded or no longer the top card of the Omen stack.
Terrain Cards
As the world draws closer to its end, the land irrevocably shifts and changes. Certain game effects instruct players to place a Terrain card on a space of the game board. While a Terrain card is on a space, the text and name of that space is ignored and the text and name of the Terrain card is used instead. If an effect refers to a space that is no longer on the board because that space contains a terrain card, that effect is ignored.

Terrain Card
For example, if the Temple space contains a “Chasm” Terrain card and a “6” is rolled at the Tavern, the effect of moving to the Temple is ignored. Terrain cards can only be removed by effects that specifically remove Terrain cards. Players cannot place Terrain cards on spaces in the Inner Region. If an effect instructs a player to place a Terrain card where he cannot, he ignores that effect.
If an effect causes a player to place a Terrain card on a space and there are no cards of the required type left in the Terrain deck, he must choose a Terrain card of that type on the board and move it to that space. If a player places a Terrain card on a space that already contains a Terrain card, he removes the original Terrain card from that space and returns it to the Terrain deck.
If a player places a new character on the game board, he ignores any Terrain cards when placing that character.
Terrain Cards and Movement
If the Sentinel space contains a Terrain card, characters may cross freely from the Outer Region to the Middle Region; they do not have to defeat the Sentinel. Likewise, if the Portal of Power space contains a Terrain card, characters may cross freely from the Middle Region to the Inner Region; they do not have to pick or force the lock, nor are they stopped by the Warlock if they have an uncompleted warlock quest.
Placing Random Terrain Cards
Some game effects will instruct players to place a random Terrain card. When this occurs, the player shuffles the Terrain deck, draws the top card, and places it as directed by the effect.
If there are no cards remaining in the Terrain deck when a player is instructed to place a random Terrain card, he instead takes the terrain card closest to his character and moves it to his space. If two or more Terrain cards are equally close, he chooses which one to move.
Terrain Cards and Other Expansions
When using an expansion board, if a Terrain card is on a space that allows movement between boards, characters can still move to and from the expansion board following the normal movement rules of that expansion.
If a Terrain Card is placed on the last space of an expansion board, such as the “Treasure Chamber” from The Dungeon expansion, a character must end his movement when entering that space, then encounter the Terrain card on that space.
Prowling Werewolf (Blood Moon Expansion)
The Werewolf Card lists the rules for how the Werewolf figure prowls around the game board and interacts with characters that it lands on.
Setup
At the start of the game, place the Werewolf figure on the Forest space and place the Werewolf Card faceup next to the game board.
Moving the Werewolf
Whenever a player rolls a “1” for his move, he completes his turn as normal, but then he must roll the die again and move the Werewolf figure according to the normal rules for moving a character, with the following exceptions:
• If the Werewolf figure moves during the Night and enters a space with a character, it must end its movement in
that space.
• The Werewolf figure may freely cross the Storm River at the Sentinel.
• The Werewolf figure cannot cross the Portal of Power.
• The Werewolf figure may enter and leave expansion boards, such as the Dungeon Region, according to the
normal rules for a character entering and leaving those expansion boards. If the Werewolf figure reaches the
last space on an expansion board, such as the Treasure Chamber in the Dungeon Region, it must immediately
move to any space in any Region (except the Inner Region) and end its movement in that space. The player moving
the Werewolf figure chooses which space it moves to.
Encountering the Werewolf
Whenever the Werewolf figure ends its movement on a space containing one or more characters, the player who moved the Werewolf figure must choose one character on that space. The chosen character then rolls one die and consults the chart on the Werewolf Card to determine what happens. If the characters rolls a “1” result on the Werewolf’s chart, he becomes a lycanthrope (see “Becoming a Lycanthrope” below).
Characters who land on the Werewolf figure’s space do not encounter the Werewolf figure.
Becoming a Lycanthrope
Whenever a character encounters the Werewolf figure or fights a character who has become a lycanthrope, he risks inheriting its curse and becoming a lycanthrope himself. Some of the Adventure Cards may also result in a character becoming a lycanthrope.

Prophetess is a Lycanthrope
When a character becomes a lycanthrope, he must take a Lycanthrope Card and place it faceup next to his character card. If a character is instructed to become a lycanthrope and he already has a Lycanthrope Card, the effect is ignored: the character does not take an additional Lycanthrope Card. In the digital version, characters who are lycanthropes have claw marks across their character's image on the left of the screen.
The instructions on a Lycanthrope Card are only followed when it is Night; however, the character is still considered a lycanthrope even during the Day. This distinction is important because some encounters affect characters differently if they are a lycanthrope.
If a character is turned into a Toad, he must discard his Lycanthrope Card. If a character who has been turned into a Toad becomes a lycanthrope, his Toad Card and figure change back to his original character’s card and figure. He then takes a Lycanthrope Card as normal.
Grim Reaper (Reaper Expansion)
Death does not move until a player rolls a “1” for his move. When this happens, the player must complete his turn as normal, but then must roll the die again and move the Grim Reaper according to the normal rules for moving a character, with the following exceptions:
• Because it is difficult for both the Boatman and the Sentinel to refuse anything to the Reaper, he may freely cross
the Storm River at the Sentinel, or from the Temple to the Tavern (or vice versa), at the cost of a single movement
point for either.
• The Grim Reaper will not cross the Portal of Power, as he is
already present in the Inner Region.
Whenever the Grim Reaper lands on a space containing one or more characters at the end of his movement, the player who moved the Reaper must choose a character on that space for the Reaper to visit. The player controlling that character then rolls one die and consults the chart on the Grim Reaper card to determine what happens to his character.
Characters who themselves land on the Grim Reaper’s space do not encounter the Reaper, nor can the Reaper be affected by any Spell, Adventure Card, or special ability.
If a player forgets to move the Grim Reaper or the Werewolf and the next player starts his turn, there is no opportunity to backtrack. The chance has been missed and the Grim Reaper and/or Werewolf do not move.
Movement
The game board depicting the magical land of Talisman is divided into three Regions (the Outer Region, the Middle Region, and the Inner Region). Each Region is sub-divided into spaces, and each space has its title and encounter instructions printed along its edge. Characters move around the spaces in the Region they are in and can cross between Regions as a result of encounters or card abilities.
Movement in the Outer, Middle and Expansion Regions
To move in the Outer, Middle and Expansion Regions, the player rolls one die to determine how many spaces his
character must move. (Certain Spells, special abilities, and other events may enable a character to move without rolling the die. These instances are detailed on the relevant cards.) The character then moves the full count of the die roll, either clockwise or counterclock-wise at his discretion. Direction may not be reversed during a move except when passing between the Outer and Middle Regions (see “The Sentinel Space”). A character must always move, even if he starts the turn in a space with an Adventure Card or another character. The space where a character lands is the space where he ends his movement or the space to which he is moved to as the result of an encounter or effect.
Entering the Expansion Regions
Each Region is connected to the main Talisman board at a specific main board space. A character may enter these
Regions simply by moving directly from the connected space on the main board to the Region Entrance space, if his movement die roll provides him with sufficient movement.
Entering these Regions through the connected spaces is optional. Characters may choose not to enter, and may travel around the Outer Region instead.
Movement in the Expansion Regions
Movement in the Highland, Woodland, and Dungeon follows the normal movement rules: Characters roll one die
and move the indicated number of spaces.
Each space on the these boards is marked with an arrow. These arrows point in the direction characters need to move in order to reach the end. Characters may choose to move against the arrows if they wish. However, doing so takes them farther away from the ultimate prize, and closer to the Entrance.
Note that characters must move either directly with or directly against the arrows when in these regions. The map is a linear path, and characters may not move in other directions, such as across a space’s text box.
In the City, Characters cannot move against an arrow on a street space unless an ability or effect forces them to do so.
Characters may enter a shop from the adjacent street space for one point of movement. Characters may enter a shop as long as they have sufficient movement to enter the shop; any remaining points of movement are lost.
If a character begins his turn in a shop, he cannot re-enter that shop during that turn. However, the character may enter any other shop if he has sufficient movement.
Encounters
After a character has finished his movement, he must either encounter the space he lands in or a character in that space. Characters can encounter a wide variety of monsters and personalities. Sometimes the encounters are friendly and aid the character with gifts. Other times the encounters are hostile and attack the character, or even turn him into a slimy Toad!
Characters only have encounters during their own turn, unless specifically instructed otherwise.
Encounters in the Outer, Middle and Expansion Regions
Characters can only have encounters in the space where they land. They may never encounter anything in the space where they start their move.
A character must choose to encounter either one character of his choice who is in the space where he lands, or the space itself, or a Dragon Scale.
Encountering Another Character
An encounter with another character always takes one of two forms. The character whose turn it is may either attack (see “Battles Between Two Characters”) or use one of his special abilities on the other character. If a character kills another character during the encounter, he may take any Objects, Followers, and gold from the killed character to add to his own. Any Objects, Followers, and gold not taken are left on the space.
If a player chooses to encounter a character instead of encountering a space, his character may not visit any Stranger or Place there, nor may any Objects, Followers, and gold be taken from the space.
Encountering a Space – Draw Cards Spaces
Characters must always follow the instructions on the space where they land if their player chooses to encounter the space instead of encountering another character. If a space instructs a player to draw cards, the cards to be drawn are always Adventure Cards, drawn from the top of that Regions Adventure deck. If there are already any cards of any type on the space (such as Adventure, Purchase, or Spell Cards), then only enough cards to make up the given number may be drawn.
Adventure Cards must be dealt with in the order determined by their encounter number, starting with the lowest number, then the next lowest, and so on. In the case of a tie, the character encounters Adventure Cards in the order they were drawn.
After any Enemies in the space are killed (see “Resolving Battles vs. Creatures” ) or evaded (see “Evading” on page 23), any Stranger or Place there must be visited and any gold, Objects, and Followers may be taken.
If a character ditches Followers or Objects onto a draw cards space (see “Ditching Followers and Objects”), he may only draw enough cards to make up the given number that may be drawn. For example, a character ends his move on a Draw 1 Card space and then ditches one of his Objects. He does not draw any cards now since there is already a card on his space.
A character may ditch Followers or Objects on a space to avoid drawing more cards, but he may not take them back during the same turn. Therefore, any Followers and Objects that are left on the space become available for other characters to take if they land on that space.
Encountering a Space – Other Spaces
Characters must follow the instructions on the space if their player chooses to encounter the space instead of encountering another character. However, before they do, any Enemies in the space must first be killed (see “Resolving Battles vs. Creatures” below) or evaded (see “Evading”). Any Stranger or Place there must be visited and any gold, Objects, and Followers may be taken.
Attacks
Attacks are split into two types: battles and psychic combats. A battle occurs when a character is attacked by a creature whose Strength is given, and a psychic combat occurs when a character is attacked by a creature whose Craft is given. If a player decides to attack another character, they must fight a battle unless the attacker has a special ability that lets him use psychic combat instead.
Battles
Battles occur when:
1. A character encounters an Enemy - a Monster, Dragon, Animal, or any creature whose Strength is given;
or
2. A character decides to attack another character, unless a special ability allows him to attack by psychic combat instead.
Resolving Battles vs. Creatures
Battles against creatures are resolved in the following steps:
1. Evade
The character first declares whether he is evading or not (see “Evading”). If not, then a battle takes place.
2. Cast Spells
Any Spells that the player wishes to cast must be cast before the attack roll is made. Any effects or abilities that
affect a character’s Strength or Craft must be implemented before the attack roll is made.
3. Character Attack Roll
The character rolls one die, the result of which is considered the attack roll. The character’s attack score is
the attack roll plus the character’s Strength, plus any other modifiers that may apply. Remember that only
one Weapon may be used at a time (see “‘Weapon’ and ‘Armour’ Keywords”).
4. Creature Attack Roll
Another player now rolls a die for the creature’s attack roll and adds this to the creature’s Strength. The character may now pay one fate to reroll his attack roll if he wishes.
5. Compare Attack Scores
The total of the creature’s attack roll and Strength is the creature’s attack score. If the character’s attack score is
higher, the creature is killed. If the creature’s attack score is higher, the character is defeated and loses one life (use of an Object, Spell, or special ability may prevent this). If the attack scores are equal the result is a stand-off. If the character is defeated or the battle ends in a stand-off, the character’s turn then immediately ends.
Stand-Off
In a stand-off, neither side is harmed (characters do not lose a life and creatures are not killed) and that turn immediately ends. On the character’s next turn, the character leaves that space without again encountering whatever he fought, unless indicated otherwise.
More Than One Enemy
If there is more than one Enemy that attacks by Strength on a space and they have the same encounter number, they fight as one during the battle, adding their Strength together with just one attack roll to make a single, combined attack score.
Battles Between Two Characters
Battles between two characters are resolved in the following steps:
1. Evade
The character being attacked first has the opportunity to evade. If he chooses not to, or is not successful, then battle takes place.
2. Cast Spells
Both characters have the opportunity to cast Spells before the dice can be rolled. Any effects or abilities that affect a character’s Strength or Craft must be implemented before the attack roll is made.
3. Determine Attack Rolls
Both characters then roll a die to determine their attack roll. Once both attack rolls have been made, the attacking
character must choose first whether to pay fate to reroll. Once he has chosen, the defending character has the same option. No matter what the defender chooses, though, an attacking player who decided not to spend fate when he had the opportunity may not change his mind after the defender has made his own choice.
4. Compare Attack Scores
Once the option to spend fate has been addressed, the attacking character’s attack score is determined as in battles against creatures and Enemies. The defender’s attack score is determined the same way as the attacker’s score. The character with the higher attack score wins the battle. If the scores are equal, the result is a stand-off (see “Standoff”).
5. Claim Reward
The winner may either force the loser to lose one life (which may be saved by use of an Object or Spell), or may
take one Object or one gold from the loser to add to his own. If the winner kills the loser by forcing him to lose
his last remaining life, the winner may take any Objects, Followers, and gold from the loser to add to his own.
Any Objects, Followers, and gold not taken are left on the space. The turn then ends.

In this example, The Wizard has a Sword in addition to Invisibility and Psionic Blast Spells. The Wizard also has one Strength
counter, two Craft counters, and three fate. During the Wizard’s turn, he lands on the Fields and draws an
Adventure Card, a Strength 6 Giant. The Wizard could choose to evade the Giant by casting his Invisibility
Spell but he decides to attack the Giant instead. Since the Giant has a Strength value, the Wizard must fight him with a battle as opposed to psychic combat.
The Wizard chooses to cast the Psionic Blast Spell, which allows him to add his Craft value of 5 to his
Strength. Since the Wizard is in battle, his Sword adds an additional point of Strength for a total of 9 Strength
(5 from Psionic Blast, 2 from his Strength value, 1 from his Strength counter, and 1 from the Sword). The
Giant rolls a “6” for his attack roll and the Wizard rolls a “3” for his attack roll.
After their attack rolls, both the Giant and the Wizard have the same attack score of 12, which would result
in a stand-off. The Wizard decides to pay a fate token to reroll his attack roll, and this time gets a “5” result. Now the Wizard has an attack score of 14 and the Giant has an attack score of 12. Since the Wizard’s attack score is higher, he kills the Giant and takes the Enemy card as a trophy. If the Wizard’s attack score had been lower than the Giant’s, the Wizard would have lost a life and his turn would have immediately ended.
Psychic Combat
Psychic Combat occurs when:
1. A character is attacked by an Enemy - Spirit or by any creature whose Craft is given.
Or
2. A character whose special ability permits him to attack another character by psychic combat elects to do so.
Resolving Psychic Combat
Psychic combat is resolved in exactly the same manner as battles (see “Battles”), except:
1. Craft is substituted for Strength.
2. No Object can prevent the loss of a life.
Character Rules
This section covers more detailed rules regarding characters, including how they gain wealth and Followers, cast Spells, increase Strength and Craft, avoid creatures, and change alignment.
Gold
Gold allows characters to buy Objects and pay for services. A character’s wealth is recorded by placing gold coins beside the character card.
Each character starts the game with one gold, and additional gold is usually acquired as the result of encounters. Prices are given in gold coins (G). Thus “3G” represents three gold coins.
Payments for any purchases or services that are not made to another character are paid into the gold stockpile.
Any gold received from any source other than another character is taken from the gold stockpile.
Gold is not considered an Object, so it does not count against a character’s Object carrying limit.
If a character is required to lose gold and he does not have any, then there is no effect.
Objects
Both Objects and Magic Objects are classed as Objects. During the game, characters usually acquire Objects as the result of encounters. Any Objects characters have are placed below their character card and must be kept faceup.
Object Carrying Limits
No character may have more than four Objects unless he has a Mule, Horse and Cart, etc.
Any character acquiring more than four Objects must decide which to keep. The remainder are immediately placed faceup on the character’s space.
Trinkets are special Objects and are distinguished with a Trinket keyword printed above the card’s special
ability.
Trinkets are treated in all respects like normal Objects, except that they do not count towards a character’s
carrying capacity. A character may have four normal Objects in addition to any number of Trinkets.
Trinkets may be ditched, discarded, stolen, or sold like normal Objects.
Cursed Keyword
Some Objects and Followers have been twisted and tainted by dark powers and have the Cursed keyword. Cursed
Objects and Followers must be taken by a character encountering them (even if the character is at his Object
Carrying Limit) and cannot be ditched.
When a character has more Objects than his Carrying limit, and must decide which Objects to keep, a character must choose to keep as many Cursed Objects as possible. A character can only choose not to keep a Cursed Object if he has more Cursed Objects than his Carrying limit.
Cursed Objects and Followers may be discarded, stolen, and sold as normal.
“Weapon” and “Armour” Keywords
Some Objects that increase a character’s fighting ability have the keyword Weapon next to the text for the card’s ability. A character may only use one Weapon during an attack.
Some Objects that prevent the loss of life when a character is defeated have the keyword Armour next to the text for the card’s ability. A character may only use one Armour during an attack.
Followers
During the game, characters usually acquire Followers as the result of encounters. All Followers accompanying a character are kept below the character card and must be kept faceup.
A character may have any number of Followers.
Losing a Follower
Any Followers that are killed (e.g., in the Chasm or the Vampire’s Tower) or that must be discarded are placed on the Adventure Card discard pile.
Spells
In the magical land of Talisman, anyone can cast Spells as long as he has enough Craft. Some characters start the game with one or more Spells, and new Spells can be found by any character as he travels around the board.
Gaining Spells
All characters may acquire and cast Spells, if their Craft is sufficient to permit this. Only those characters whose special abilities allow them to start the game with Spells do so. Otherwise, Spells are usually acquired as the result of encounters. Spells gained are taken from the top of the Spell deck. When this deck is exhausted, all of the discarded Spell Cards are shuffled and placed facedown to form a new Spell deck.
Spells are kept facedown so that the other players cannot see them, but a player may look at his own character’s Spells at any time. The effect of each Spell, and when it can be cast, are detailed on the individual Spell Cards.
The number of Spells that any character can have at one time is limited by the character’s Craft as follows:
|
Total Craft |
1 |
2 |
3 |
4 |
5 |
6+ |
|
Maximum number of spells |
0 |
0 |
1 |
2 |
2 |
3 |
Example of a Spell Limit...
A Wizard with a Craft value of 5 has Solomon’s Crown (a Magic Object which adds 2 to his Craft), so his Craft is effectively 7. This allows him three Spells, which he has acquired. He lands on the Cursed Glade, where he cannot
count Craft gained from Magic Objects. His Craft drops to 5. He is now only allowed two Spells, so he must immediately discard one. A soon as he leaves the Cursed Glade, he can count the Craft for Solomon’s Crown again and may once more have three Spells, if he can acquire another.
If at any time a character has more Spells than his Craft allows, surplus Spells must immediately be placed on the
Spell Card discard pile; they cannot be cast. The character’s player chooses which Spells to discard. Spells cannot be discarded unless the character has more Spells than his Craft permits, however. The only other way to get rid of a Spell is to cast it!
Casting Spells
Castings Spells is always optional. Players may keep Spells for as many turns as they like before they choose to cast them. A Spell can only be cast as stated on the Spell Card. Once a spell is cast and its effect has ended, it is placed on the Spell Card discard pile.
Spells affecting characters affect them wherever they are on the board, no matter which Region. Spells affecting creatures, however, cannot affect creatures encountered in the Inner Region.
The maximum number of Spells a character may cast during his turn is equal to the number of Spells he had at the start of that turn. A character may only cast one Spell during another character’s turn. This does not apply to the Command Spell, however (see “The Crown of Command” Ending Card).
Example of a Turn
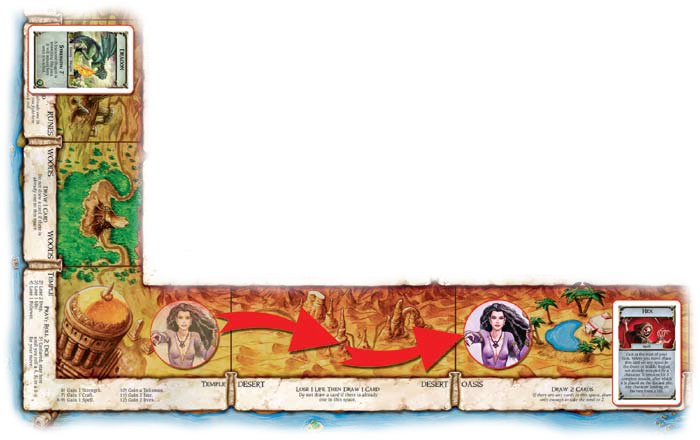
The Sorceress is on the Temple and rolls a “2” for her move. She may therefore move to either the Runes or the Oasis.
There is a Dragon faceup on the Runes where the instructions are to draw one card, so the Dragon will count as the card to be drawn. The Dragon has a Strength of 7 and will get +2 on its attack roll because of the mystic Runes. Since the Sorceress’s current Strength is 3, she would certainly lose a life there.
On the Oasis, she sees a Hex Spell cast earlier by another character. This will also cause her to lose a life, but since the instructions there are to draw two cards, the Hex spell will only count as one of them and she will have the opportunity to draw one Adventure Card to make up the total of two to be drawn. She decides to move to the
Oasis, loses a life because of the Hex Spell, and draws an Adventure Card. It turns out to be another Dragon, which attacks her. Not her lucky day at all!
Trophies
When a character kills an Enemy, he may take it as a trophy. A character may exchange trophies at the end of his turn to gain additional Strength and Craft counters.
Gaining Strength
A character gains one Strength counter for every seven points of Strength marked on the trophies he turns in. Enemy cards thus exchanged are then placed on the Adventure Card discard pile. Excess Strength points of the trophies above a multiple of seven are lost.
Strength counters may also be gained as a result of encounters.
Gaining Craft
A character gains one Craft counter for every seven points of Craft marked on the trophies he turns in by discarding them to the Adventure Card discard pile. Excess Craft points turned in above a multiple of seven are lost.
Craft counters may also be gained as a result of encounters.
Evading
Characters sometimes have the option to evade creatures and other characters, such as by casting an Immobility or Invisibility Spell. The evading character cannot then affect or be affected by the character or creature in any way.
Only other characters can be evaded in the Inner Region; creatures from board spaces there cannot be evaded.
Encounters that may be evaded are:
1. Anything that attacks a character.
2. Any character attempting to attack or use a special ability.
3. Creatures that appear as a result of an Event, Place, or Stranger card (e.g., the Dragon from the Cave Adventure
Card).
Alignment
A character’s alignment shows his personality. A good character is polite and law-abiding, an evil character is a
black-hearted villain, and a neutral character falls somewhere between these two extremes. Alignment may change during the game as the result of encounters or by the use of a special ability.
Changing Alignment
When a character changes alignment, an Alignment Card is taken and placed beside the character card with the
appropriate card faceup to show the characters new alignment. When a character reverts to his original alignment, as it is printed on the character card, the Alignment Card is discarded.
These actions occur automatically in the digital game and a character's alignment is shown as a card in their inventory.

Good Neutral Evil
No character, including the Druid, may change Alignment more than once in any turn.
If a character who changes alignment has any cards not permitted by a new alignment (such as the Holy Grail or Runesword), those cards must immediately be ditched in the space he occupies.
Golden Rules
The following rules are Talisman's "Golden Rules", which supersede all others.
Special Ability vs. Rules
In any instance where a special ability or effect is at a variance with the basic rules, the special ability or effect always overrides the rules.
Can vs. Cannot
In any instance where a card’s effect indicates that a character cannot perform an action or use an ability (such as casting a Spell or using an Object), the character cannot do so. In other words, the forbidding effects of cards override other abilities and effects. For example, if a card indicates that no Weapons can be used when fighting a certain creature, the Warrior may not use any Weapons, despite his ability that allows him to use two Weapons at the same time.
Natural vs. Modified Roll
If an effect or special ability refers to a die result, only the number appearing on the die is considered, not the modified result obtained by adding bonuses or subtracting penalties. For example, the Troll’s special ability allows him to regenerate whenever he rolls a “6” for his move. During the Troll’s turn, he rolls a “4” for his move. He also uses a card that allows him to add 2 to his movement roll for a total of 6. However, the Troll may not regenerate this turn since the actual die result is a “4” instead of a “6.”
Limited Resouces (Physical game only)
All resources are limited to the number of components provided with the game. For example, if all Strength counters are in use, no additional Strength can be gained until some of those counters have been returned to the Strength counter stockpile. If a character is able to trade five 1–point counters for the corresponding one 5–point counter, he must do so.
Other Rules
This section covers rules that may occur as a result of encounters or moving between different Regions.
Toads
When a character is turned into a Toad for three turns, a Toad figure is substituted for the character’s figure on the board and the player lays a Toad Card on top of his character card. When the character reverts back to his original form, remove the Toad Card and exchange the Toad figure for his character figure at the end of his third turn.

A Toad has Strength 1 and Craft 1, which are not modified by Strength and Craft counters accumulated prior to transformation. Although a Toad can gain and lose Strength and Craft, these modifications disappear when the Toad turns back into the original character. At that point, the character’s pre-transformation Strength and Craft counters are once again used and resume their effects.
A Toad cannot hold objects, gold, or have followers. Drop these on the space when turned into a Toad. If a player encounters an object or follower while he is a Toad, it must be dropped on his space.
A character retains his trophies and can still gain trophies while a Toad. However, any Strength or Craft gained through trophies while the character is a Toad are lost when the character reverts to his original form (so it is usually a bad idea to trade in trophies while a Toad).
A Toad does not roll the die for movement, but must move only one space per turn.
Toads can neither gain nor cast Spells, but a character’s Spell Cards are not lost upon transformation into a Toad. They simply cannot be used until the character reverts back to his original form.
A Toad’s lives are those of the original character. Thus, any lives lost or gained by the Toad affect the status of the original character.
A Toad’s fate tokens are also those of the original character. Similarly, any fate lost or gained by the Toad affect the status of the original character. Toads may use fate as normal.
Toads have encounters when landing on a space like any other character.
A Toad has no special abilities. Those of the original character cannot be used while the character is a Toad.
If a character is already a Toad and is turned into a Toad again (for example, as a result of the Random Spell), the character remains a Toad for three more turns starting from the second transformation.
Losing a Turn
Any instructions that result in the loss of a turn by the character encountering them ends the character’s turn immediately. This counts as a missed turn for that character if there are other cards to be encountered; otherwise, he misses his next turn instead.
Having and Using Cards
Characters are considered to have anything in their possession, such as Objects, gold, fate, Followers, and Spells.
When a character implements the ability of a card’s text box, he is considered to be using the card. Using cards is optional, and a character may always choose when to use a card he has. For example, the Cross allows a character to automatically destroy Spirits without resorting to psychic combat. The character may choose not to use the Cross and may attack a given Spirit instead.
Characters may have cards that they are not permitted to use, unless a given card specifically states otherwise. For example, the Monk character may not use Weapons in battle but he may have the Holy Lance in his possession to sell to the Alchemist, deliver for a quest in the Warlock’s Cave, or simply to prevent another character from picking it up. However, the Monk may not have the Runesword, because that card states that no good character may have it. A Monk encountering a Runesword must leave it faceup in his space.
Characters are not permitted to take cards that they may not have. For example, if a character may not have Followers, he may not take one by casting the Mesmerism Spell on another character.
Ditching Followers and Objects
A character may ditch any of his Followers or Objects at any time by leaving them faceup in the space he occupies. If a character ditches any Followers or Objects, he cannot take them back during the same turn.
Talisman and Purchase Cards
Whenever a character is given or buys a Talisman or Purchase Card, the appropriate Talisman or Purchase Card should be taken from their respective decks.
Talisman and Purchase Cards are treated in all respects like Adventure Cards, except that instead of being placed on a discard pile when not needed, they are instead returned to their appropriate deck and are available to other characters once more. Should there be no Talisman or Purchase Cards left of a particular item, then that item is not available at that time.
Talisman and Purchase Cards may be ditched, like other Follower and Object Cards.
Gaining Talismans
There are two ways characters can acquire Talismans. First, they can be gained as encounters drawn from the Adventure decks. Second, they can be acquired by undertaking a quest assigned at the Warlock’s Cave.
Warlock's Cave
A character who lands on the Warlock’s Cave may choose to accept a quest, or not, as he wishes. If a character chooses to accept a quest, that player chooses freely one of the available Warlock Quest Cards from among those available in the Warlock Quest Card deck. Once the quest is complete, the card is removed from the game. Therefore, each Warlock Quest Card may only be completed once per game. If a character with a Warlock Quest Card is killed, return the card to the deck.
A character may not go on more than one quest at a time. If a character has already completed a quest and lands on the Warlock’s Cave again, he may choose to go on another quest by choosing a new Quest Card.
A character must attempt to complete his quest immediately if he is able to do so. In addition, the Warlock will prevent any character who has accepted a quest from opening the Portal of Power until he has first completed his quest.
Gaining Rewards
Characters who complete a Warlock Quest immediately teleport to the Warlock’s Cave. The player may then draw
the top card from the deck of Quest Reward cards, or gain a Talisman from the Talisman deck (if available). Characters who complete a Warlock Quest still teleport to the Warlock’s Cave, even if they choose to gain a Quest Reward instead of a Talisman.
When a character gains a Quest Reward, the card is placed faceup in his play area. Some Quest Rewards give characters a bonus and then are immediately discarded, while other Quest Rewards allow characters to keep the card until they choose to use its bonus. The effects of this bonus are described on the Quest Reward Card.
When a Quest Reward is discarded, the card is removed from the game. Therefore, each Quest Reward Card may only be gained once per game.
Quest Rewards are not considered Objects, Spells, or Followers. Therefore, they cannot be ditched, stolen, sold,
or traded. If a character is killed, he must discard all of his Quest Rewards. Characters may gain any number of Quest Rewards during the game.
Resolving Cards Without an Ecounter Number
Cards that are placed on spaces and do not have an encounter number (such as the Hex Spell) must be resolved before the character encounters any other character, cards, or the instructions on the space itself.
Fireland Tokens (Fireland Expansion)

Fireland Token
Fireland tokens represent the destructive influence of the Ifrit, who bring flame and death wherever they march. If a character ends his turn in a space with a fireland token, he must lose 1 life.

Noble Ifrit
Noble Ifrit Cards
Some Enemy Adventure Cards included in The Firelands expansion have ongoing effects that are in play until the Enemy is defeated. These Noble Ifrit cards are identified by their distinctive colour.
Crossing Between the Outer and Middle Regions
The Storm River, which separates the Outer Region from the Middle Region, can be crossed by using the bridge that connects the Sentinel space (in the Outer Region) to the Hills space opposite (in the Middle Region).
The Storm River can also be crossed using a Raft, or as the result of an encounter.
The Sentinel Space
A character may cross the Sentinel bridge in either direction if the die roll for his move is sufficient to carry him across it and into the Region on the opposite side.

The Sentinel attacks a character every time he attempts to cross the Sentinel bridge from the Outer Region to enter the Middle Region.
A character defeating or evading the Sentinel must continue his move by entering the Middle Region and continuing to move in either direction to the full value of his movement roll. A character defeated by the Sentinel loses one life (which may be saved by use of an Object or Spell), and his turn ends immediately in the Sentinel space.
A character in a stand-off (see “Stand-off”) with the Sentinel does not lose a life, but his turn still ends immediately in the Sentinel space. The Sentinel does not attack characters passing through the Sentinel space while moving in the Outer Region, characters crossing back from the Middle Region to the Outer Region, or
characters who end their movement on the Sentinel space.
When crossing from one Region to another, a character may change the direction of his move upon entering the new Region.
Rafts
Any character wishing to cross the Storm River using a Raft must either build one or acquire one as the result of an encounter.
Any character in a Woods or Forest space at the start of his turn who has an Axe may declare that he is building a Raft for that move. Instead of moving, the character takes a Raft Card from the Purchase deck (if available).
Any character acquiring a Raft may cross the river at the start of his next turn. The character may cross the river to any space of his choice directly opposite the one he is in. This is his move for that turn; he does not roll the die to determine his movement.
A Raft can never be left behind or taken along to be used on a future turn. Whether or not it is used, it must be placed on the Adventure Card discard pile or back with the Purchase deck after the character has either used it or decided not to do so.
Example of Crossing the Sentinel Bridge
The Sorceress is on the Graveyard and rolls a "6" for her move. She decides to move clockwise to the Sentinel space in order to cross the Sentinel bridge to the Middle Region. On reaching the Sentinel space, she is attacked by the Sentinel.
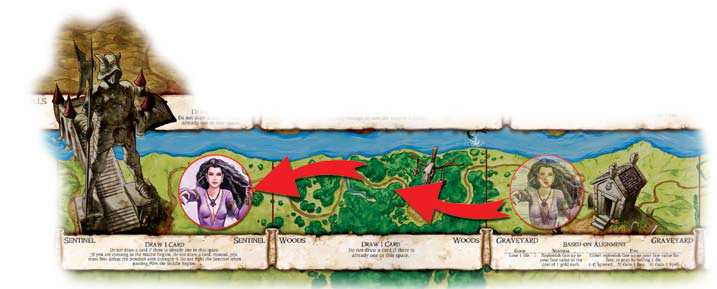
The Sorceress then casts an Immobility Spell on the Sentinel, allowing her to evade it instead of resolving the battle.

The Sorceress now moves on to the Hills in the Middle Region and decides to continue her move counterclockwise in the Middle Region, finally landing on the Portal of Power.
Crossing Between the Middle and Inner Regions
The Portal of Power connects the Portal of Power space to the Plain of Peril space.
The Portal of Power

The Inner Region can only be entered by passing through the Portal of Power, which must be opened before it can be traversed. A character can only try to open the Portal if his move is sufficient to carry him beyond it. A character must attempt to open the Portal each time he passes through it; previous passage is no guarantee of future passage.
A character attempting to open the Portal follows the instructions on the Portal of Power space. If successful, the character’s turn ends on the Plain of Peril. If unsuccessful, the character’s turn ends immediately on the Portal of Power space.
A character wishing to pass through the Portal of Power from the Inner Region to the Middle Region does not need to open it. He simply moves from the Plain of Peril to the Portal of Power space. Doing so counts as his entire move for that turn.
Movement in the Inner Region
The die is not rolled for movement in the Standard or Dragon Realm Inner Region. Instead, a character can move
only one space per turn there.
The encounter instructions on each space in the Inner Region must be completed before a character can move on toward the Crown of Command.
The die is not rolled for movement in the Dragon Tower. encounter each other. Instead, a character draws the number of cards from the Dragon King’s deck instructed by his space and encounters them. Note that characters draw Dragon Cards at the start of their turn to determine how many spaces they move; characters do not draw cards when they land on the space.
Encounters in the Inner Region
A character does not draw Adventure Cards in the Inner Region. Instead, the encounter is detailed in the instructions for the space. The instructions must be followed, unless the character is turning back.
None of the creatures in the Inner Region can be affected by any Spell, nor may they be evaded.
Encountering Dragon Cards in the Dragon Tower follow all of the normal rules (cards must be resolved in order of their encounter number, Enemies with the same encounter number add their Strength and Craft together, etc.), except creatures cannot be affected by any Spell, nor may they be evaded. Characters may use dragon scales as normal. If a character is defeated or is instructed to miss his turn, he may not encounter any of the remaining cards on the space.
After a character has finished resolving the Dragon Cards he encounters, he moves one space forward towards the Crown of Command, plus one additional space for each Enemy he killed during his turn. If a character is defeated on a stairway, he must move one space back towards the Portal of Power as indicated on the space’s instructions.
After the character ends his turn, all cards and tokens in the Dragon Tower are discarded.
If a character on a stairway kills an Enemy but is defeated by another card during his turn, he must still move one space back towards the Portal of Power instead of moving forward.
If a character on a stairway has a stand-off, he moves forward normally.
If a card is placed on the Dragon Tower at the start of a character’s turn, such as by a Spell or if the character ditches a Follower or Object, he still draws the number of cards indicated on the Dragon Tower’s space. Characters must always draw the number of cards indicated on the Dragon Tower’s space regardless of how many cards were already placed on the space.
If a character is forced to move clockwise, he moves following the direction indicated by the arrows on each space.
If a character is forced to move counterclockwise, he moves against the direction indicated by the arrows on each space.
Encountering a Character in the Inner Region
A character may only encounter another character on the Plain of Peril and Crown of Command. Characters in the Inner Region may be targeted by Spells and other effects unless the card specifically states otherwise.
Encounters with other characters on the Plain of Peril are treated exactly as encounters between characters in the Outer and Middle Regions.
Encounters with other characters on the Crown of Command are also treated as encounters in the Outer and Inner Regions, except characters must encounter each other.
Turning Back
A character in the Inner Region may decide at any time to turn back and move back towards the Plain of Peril. A character who has turned back still only moves one space per turn, but ignores the instructions on all of the spaces on his return to the Plain of Peril. Once a character has declared his intention to turn back, he cannot change his mind and he must go all the way back to the Plain of Peril. Once there, however, the character is free to do whatever he likes, including heading back toward the Crown of Command or leaving the Inner Region through the Portal of Power.
The Crown of Command
The last space on the board is the Crown of Command. It can only be reached from the Valley of Fire space or the final draw 3 space in the Dragons Tower (if used as the Inner Region instead), which can only be entered by characters that have a Talisman. If a character does not have a Talisman, then he must turn back. Any card or board effect that would place a character on the Crown of Command should instead place the character on the Valley of Fire or Draw 3 space. A character is not forced off the Crown of Command space if he loses his
Talisman, but he cannot re-enter if he leaves without obtaining a new one first.
In order to confront the Ending, characters must overcome the dangers of the Inner Region and travel to the Crown of Command in the centre of the board overlay. When a character enters the Crown of Command, he immediately reveals (if hidden) the ending and follows its instructions. If the Ending is The Dragon King, use instead the currently crowned dragon king (Cadorus, Grilipus, or Varthrax).
When a character is on the Crown of Command space, a character does not move but remains there instead. Characters on the Crown of Command cannot turn back.
If there is already another character on the Crown of Command space when a character lands on it, the character there must be encountered. Once two (or more) characters are on the Crown, those characters’ turns consist only of encountering one of the other characters. A character who is alone on the Crown of Command space on his turn must follow the instructions on the ending card. If a character is killed by the Command Spell, that player loses the game and may not start another character.
Once any character has reached the Crown of Command, any character that gets killed is out of the game. Note that this rule stays in effect for the rest of the game, even if a character leaves the Crown of Command.
The Dragon King
When a character enters the Crown of Command, and the Ending is The Dragon King, he immediately attacks the
current Dragon King. The character must choose whether to attack the Dragon King using Strength or Craft. Each time he defeats the Dragon King, he must remove one of the Dragon King’s lives and immediately attack him again.
The character who removes the last life on the Dragon King wins the game!
If a character confronting the Dragon King has a stand-off or is defeated, his turn ends and he must attack the Dragon King at the start of his next turn. If the character is defeated, in addition to losing a life, he suffers the effects of the Dragon Rage listed on the Dragon King’s card. If the character is killed and there are no other characters on the Crown of Command, the Dragon King heals all his lives.
Dragon Rage
Each of the three Draconic Lords features a Dragon Rage effect: Varthrax forces characters to discard a Follower,
Cadorus forces characters to discard an Object, and Grilipus forces characters to discard a Spell.
If a character does not have the required card to discard, he loses one life instead. If a character has a dragon scale that matches the Draconic Lord, he may discard the dragon scale to cancel the Dragon Rage and not suffer any of the effects (see “Claiming Dragon Scales”).
If three dragon scales are placed on a Draconic Lord while any characters are on the Crown of Command, one dragon scale from the Draconic Lord’s card is placed on a space and the two remaining dragon scales on the card are discarded as normal. However, the Crown token is not moved to the Draconic Lord. In other words, the Dragon King does not change while a character is on the Crown of Command.
Wrath of the Dragon King

If a Draconic Lord is crowned when he is already the current Dragon King, the following effects are applied to every space that has a dragon scale that matches the Dragon King:
• All characters on the space suffer the Dragon Rage of the Dragon King.
• All cards on the space are discarded, including any Adventure, Dragon, Spell, and Purchase Cards as well as cards
from any other decks. Any dragon scales on the board remain.
The wrath of the Dragon King is implemented after the Draconic Lord is crowned, but before the character places a dragon scale on his space.
The Cataclysm
Terrain Cards and Denizens
If a Terrain card is placed on a space with any Denizen cards, then all Denizens on that space are discarded. If there are any Denizen cards on a space with a Terrain card and the Terrain card is removed from that space, then all Denizens on that space are discarded.
Denizens
The Cataclysm killed many, and scattered those who remained throughout the lands. Now, they slowly return to places of civilisation, offering their goods and services to brave adventurers.

Denizen Card
There are a number of spaces on the Cataclysm board, along with the “Settlement” Terrain card, that instruct a character to draw a denizen. When a character encounters any of these spaces, he draws one Denizen card from the top of the Denizen deck and adds it to his space. Then, he visits one Denizen on his space.
When a character visits a Denizen, he resolves the text on the card. If there is a numbered list without special instructions, he rolls one die and resolves the effect listed next to the result of his roll. If a character cannot resolve the text on the Denizen he is visiting, nothing happens, though the Denizen still counts as having been visited. For example, if a character visits the Doctor and has no lives to heal or gold to pay the Doctor, nothing happens.
After a character visits a Denizen, that Denizen is discarded unless the trait on its card matches the name of the space the character is currently on. Denizens with the “Any” trait are never discarded after being visited, and Denizens without traits are always discarded after being visited.
Denizen cards do not count as Adventure cards, and do not count towards the number of cards on a space. Denizens can only be visited if a card or board space instructs a character to do so.
If a character is instructed by a card or rule to visit a specific person at a space (for example, the Hag requires
that character to visit the Village Mystic at the Village), that character can instead visit the Denizen with the same name, no matter the space that Denizen is on.
Rolling on Denizen Spaces
Some spaces that once instructed players to roll dice (City, Tavern, Chapel, etc.) now have players draw Denizens. If a card instructs a player to roll one die and use the listed results of another space, he instead chooses and visits a Denizen on the named space. If there are no Denizens on that space, then nothing happens. For example, if a character encounters the Carnival and is instructed to roll one die with the same results as the Tavern, he instead chooses one Denizen at the Tavern and visits it.
Remnant Cards

Remnant Card
Buried and lost for hundreds of years, ancient treasures, creatures, and places lay scattered across the land of Talisman, available to the first hero who digs deep enough at the right location.
At the start of the game, place one Remnant card facedown on each space with a Remnant symbol, except for the Ruins, upon which two Remnant cards are placed. A facedown Remnant card does not count as an Adventure card and does not count towards the number of cards on a space.
When a character lands on a space with a facedown Remnant card, he flips it faceup before deciding to encounter the space or a character on it. A faceup Remnant card counts as an Adventure card for all abilities and effects.
When a Remnant card is discarded, it is placed in the Adventure deck discard pile. If the Adventure deck discard pile is shuffled back into the Adventure deck, any Remnant cards in the discard pile are also shuffled into the deck. After the game ends, return these cards to the Remnant deck.
The City
Entering the City Region
The City Region is connected to the main Talisman board at the main board’s City space. A character may enter the City Region simply by moving directly from the City space on the main board to the City Gate space, if his movement die roll provides him with sufficient movement.
Entering the City Region through the City space is optional. Characters may choose not to enter the City Region and may travel around the Outer Region instead. When characters land directly on the City space in the Outer Region, they must encounter the space as normal.
Leaving the City Region
Some City encounters grant characters the opportunity to exit the City and return to the main game board. Other than these encounters, the only ways to leave the City are to either visit the Wharf space or to exit the City via the City Gate space. A character who wishes to leave the City does not have to land exactly on the City Gate. A character with sufficient movement to continue past the City Gate must choose between continuing his movement clockwise or counterclockwise from the City space of the Outer Region.
Encounters in Shops
If a character enters a shop, he must either encounter the shop or a character in that space. If a character encounters the shop, he must follow the instructions on the space, such as purchasing a card or performing an action. Characters cannot enter a shop and “do nothing.”
Wanted Posters

Wanted Posters are available to all characters who visit the City Gate, as described in the instructions on the space. Characters may either buy any Wanted Posters on the space for one gold each, or claim the bounty from Wanted Posters on the space (see "Claiming Bounties” below). If a character buys a Wanted Poster, he may claim the bounty any time during his turn.
Claiming Bounties
Each Wanted Poster Card lists a taRget in its title. A target can be either a type of Enemy (i.e. animal, monster, etc.) or a character of a certain alignment (i.e. good, neutral, or evil).
If a Wanted Poster Card lists a type of Enemy as its target, a character may claim the bounty by discarding any
number of his trophies that match that type of Enemy at the end of his turn. The character gains an amount of gold equal to the discarded Enemy’s Strength or Craft. He then discards the Wanted Poster Card.
A character who owns a Wanted Poster card that lists a character of a certain alignment may claim the bounty on
that card by defeating another character of the matching alignment in battle or psychic combat. The character claiming the bounty rolls a die and gains that amount of gold. He then discards the Wanted Poster Card.
If a character has two or more Wanted Poster cards that list the same target, he can only claim one bounty. For example, if a character has two Wanted Posters that target Animals and he discards one Animal trophy with a Strength of 3, he can only claim one bounty and gain three gold. He then discards one of those Wanted Poster Cards. The character cannot use both Wanted Posters for the same trophy to claim a bounty of six gold.
Thrown in Jail
The Jail space is not a shop or street space and cannot be entered unless an effect or encounter throws a character in Jail. When a character is thrown in Jail, his turn immediately ends.
When a character starts his turn in Jail, he does not roll a die for his movement. Instead, the character must roll a die and consult the chart on the Jail space. If a character fails to escape the Jail, he must roll again on his next turn. Characters cannot use effects or special abilities to move out of the Jail; characters can only escape by following the instructions on the Jail space.
Characters in Jail cannot encounter each other. However, characters in Jail can still be targeted by Spells and are affected by Events as normal.
Shop Decks
The Armoury, Magic Emporium, Pet, Potion, Stables, Wanted Poster, and Purchase decks are also referred to as shop decks. Cards from shop decks are treated in all respects like Adventure Cards, except that when they are discarded, they are returned to the bottom of their appropriate deck and are available to other characters once more. Should there be no cards left of a particular item, then that item is not available at that time.
If an encounter allows a character to gain or take a card from the Potion, Pet, or Wanted Poster deck for free, he must draw the top card of the deck.
If an encounter allows a character gain or take a card from the Armoury, Magic Emporium, Stables, or Purchase deck for free, he chooses which card to receive.
The Highland
Entering the Highland
The Highland is connected to the main Talisman board at the main board’s Crags space. A character may enter the Highland Region simply by moving directly from the Crags space on the main board to the Highland Entrance space, if his movement die roll provides him with sufficient movement.
Entering the Highland through the Crags space is optional. Characters may choose not to enter the Highland, and may travel around the Outer Region instead.
Eyrie

The Eyrie is the last space in the Highland and is the lair of the most powerful creature in the Highland – the Eagle King. When a character reaches the Eyrie, he must end his move there, even if he has more movement available.
When a character ends his move in the Eyrie, he must fight the Eagle King. If he kills the Eagle King, he may claim one of the Eagle King’s Relic Cards. Finally, whether the character kills the Eagle King or was defeated by him, the character emerges from the Highland (see "Emerge From The Eyrie" below).
Fighting the Eagle King
A character fighting the Eagle King may choose to battle or wage psychic combat against him. The Eagle King has
Strength 8 and Craft 8.
Fighting the Eagle King is conducted according to the normal rules governing attacks, save that the Eagle King cannot be evaded and only characters may attack the Eagle King; Followers, Spells, or Objects cannot fight in a character’s place.
If a character is defeated, he must lose one life as normal (use of an Object, Spell, or special ability that would prevent life loss may prevent this as normal).
Claiming Relics
Characters who kill the Eagle King and gain a Relic Card must randomly draw one card from the Relic deck. If the Relic deck has been depleted, however, no reward is available and the character receives nothing.
If a character emerges from the Highland, and later returns and kills the Eagle King again, he gains another Relic Card as a reward, if one is available.
Only characters who kill the Eagle King may claim Relic Cards. Characters who attack the Eagle King and are defeated, or have a stand-off, instead emerge from the Highland without any reward for their efforts.
Emerge From the Eyrie
If a character kills the Eagle King, he must choose any space in the Outer or Middle Region and immediately move there. The character then encounters the space or a character in the space as normal.
If a character has a stand-off, or is defeated, he must immediately move to the Crags and end his turn.
Relic Cards
Relic Cards are treated in all respects like Adventure Cards once they are in a character’s possession, except that
if they must be discarded, they are removed from the game instead of being placed in the discard pile. Such
cards do not return to the Relic deck and they are not available to characters who later kill the Eagle King.
Relic Cards may be ditched, discarded, stolen, or sold like other Adventure Cards.
Lost City Rewards
When characters encounter the Lost City space, they may be fortunate enough to gain cards from the Purchase or Relic deck. When characters gain a Weapon or Armour, they may look through the Purchase deck and choose which card they receive, as long as the Object has the proper Weapon or Armour keyword. When characters gain a Relic, they must draw one card from the Relic deck randomly.
The Woodland
Entering the Woodland
The Woodland is connected to the main Talisman board at the main board’s Forest space. A character may enter the Woodland Region simply by moving directly from the Forest space on the main board to the Woodland Entrance space, if his movement die roll provides him with sufficient movement.
Entering the Woodland through the Forest space is optional. Characters may choose not to enter the Woodland, and may travel around the Outer Region instead.
Leaving the Woodland
Some Woodland encounters grant characters the opportunity to exit the Woodland and return to the main game board. Other than these encounters, the only ways to leave the Woodland are to reach the Meeting with Destiny (see “Meeting with Destiny” below) or to exit to the Forest via the Woodland Entrance space. When exiting via the Woodland Entrance, a character with sufficient movement to continue past the Forest must choose between continuing his movement clockwise or counterclockwise in the Outer Region.
Twisting Paths
When a character enters the Woodland Region during his turn, through any means, he must take one of the three available faceup Paths when his movement ends. If a character enters the Woodland during another character’s turn, he must immediately take one of the three faceup Paths. When a character takes one of the three faceup Paths, he draws a new Path Card and lays it faceup to replace the Path he just took so that there are always three faceup Paths available to characters.
When a character with a Path leaves a Region he must discard his Path Card.
A character with a Path must always follow the Travel effect on his Path Card.
When a character with a Path Card reaches the Meeting with Destiny space, he resolves the Destiny effect at the bottom of his Path Card. After resolving the Destiny effect he discards his Path Card.
Destiny Cards
During their travels through the Woodland, characters may find themselves bound to a new Destiny,
granting them powerful abilities. When a character gains a Destiny, he places the card faceup in his play area.
Destinies are not considered Objects, Spells, or Followers. Therefore, they cannot be ditched, stolen, sold, or traded, unless an effect specifically refers to Destiny Cards. Characters may gain any number of Destinies during the game.
Destiny is a powerful force which transcends even death. When a character is killed and the dead character’s
player draws a new character, all Destinies owned by the dead character are passed to the new character and may be used normally by him.
The Meeting with Destiny is the last space in the Woodland and it is where an adventurer must go to face his destiny. When a character reaches the Meeting with Destiny, he must end his move there, even if he has more movement available.
Meeting with Destiny

When a character ends his move at the Meeting with Destiny, he must resolve the Destiny effect of his Path Card. After he does so, if he is still at the Meeting with Destiny space, he must emerge from the Woodland and move to the Forest.
Animals with Craft
Some Enemy Animals in the Woodlands are the spiritual guardians of the Woodland and have the Craft attribute instead of Strength.
Any special ability or effect targeting Animals with Strength cannot be used on Animals with Craft. The Minstrel is unable to use his ability to charm Animals with Craft, since his ability specifically refers to the Animal’s Strength. However, Animals will still not attack him.
The Dungeon
Entering the Dungeon
The Dungeon is connected to the main Talisman board at the main board’s Ruins space. A character may enter the Dungeon Region simply by moving directly from the Ruins space on the main board to the Dungeon Entrance space, if his movement die roll provides him with sufficient movement.
Entering the Dungeon through the Ruins space is optional. Characters may choose not to enter the Dungeon, and travel around the Outer Region instead.
Treasure Chamber

The Treasure Chamber is the last space in the Dungeon. It contains vast riches and magical artefacts, but it is also the lair of the most powerful creature in the Dungeon – the Lord of Darkness. When a character reaches the Treasure Chamber, he must end his move there, even if he has more movement available.
When a character ends his move in the Treasure Chamber, he must fight the Lord of Darkness. If he defeats the Lord of Darkness, he may claim treasure from the demon’s horde. Finally, whether the character defeats or was defeated by the Lord of Darkness, the character emerges from the Treasure Chamber. Each of these steps is described in detail in the next column.
Fighting the Lord of Darkness
A character fighting the Lord of Darkness may choose to battle or wage psychic combat against him. The Lord of Darkness has Strength 12 and Craft 12.
Fighting the Lord of Darkness is conducted according to the normal rules governing attacks, save that the Lord of Darkness cannot be evaded, and only characters may attack the Lord of Darkness; Followers, Spells, or Objects cannot fight in a character’s place.
If a character is defeated, he must lose one life as normal (use of an Object, Spell, or special ability that would prevent life loss may prevent this as normal).
Players should record or remember the attack scores of both the character and the Lord of Darkness. They will be needed when determining where the character emerges after leaving the Treasure Chamber.
Darkness Never Dies
When the Lord of Darkness is killed his corporeal form is broken, but his spirit remains just as potent as before. The Lord of Darkness will recover and reform his body, and he will fight any character that encounters him in later turns with full Strength and Craft. Later encounters follow all the rules for encountering the Lord of Darkness.
Claiming Treasure
Characters who kill the Lord of Darkness may look through the Treasure deck and choose one Treasure Card from it as a reward. If the Treasure deck has been depleted, however, no reward is available and a character will receive nothing.
If a character emerges from the Dungeon, and later returns and kills the Lord of Darkness again, he may choose another Treasure Card as a reward, if one is available.
Only characters who kill the Lord of Darkness may claim Treasure Cards. Characters who attack the Lord of Darkness and are defeated, or have a stand-off, instead emerge from the Treasure Chamber without any reward for their efforts.
Emerge From the Treasure Chamber
After a character kills the Lord of Darkness, has a stand-off, or is defeated, he must leave the Treasure Chamber and determine where he emerges on the board.
To determine where the character emerges, subtract the Lord of Darkness’s attack score from the character’s attack score and consult the chart on the Treasure Chamber space. The greater a character’s attack score, the closer he emerges to the Inner Region. If a character’s attack score beats the Lord of Darkness’s score by eight or more, he emerges directly on the Crown of Command! If the Lord of Darkness’s attack score is greater than the character’s attack score, the character must use the “0” result on the Treasure Chamber’s chart.
Characters that emerge on the Crown of Command do not need to have a Talisman to enter the space.
If a character kills the Lord of Darkness without resolving an attack (such as by casting the Finger of Death Spell), the character must use the “0” result on the Treasure Chamber’s chart.
The Deep Realms
Hidden between the City and the Dungeon are two small, but dangerous Realms: the Rat Queen's Lair and the Wraith Lord's Domain. Each of these Realms counts as a separate Region and is ruled by a powerful being who holds sway over all who dwell there and all who attempt to enter.
Entering the Realms
A character can enter the Rat Queen's Lair by moving into either Rat Run or Old Sewers from an adjacent space in the City, following the arrows. Characters can enter the Wraith Lord's Domain by moving into either Skull Passage or Catacombs from an adjacent space in the Dungeon, following the arrows. When a character enters a Realm, he must immediately end his movement.
Movement in the Realms
Before a character rolls a die for movement he must choose to either Escape or Press On.
If a character chooses to escape, he must roll for movement as normal and move directly against the arrow (into an adjacent Region), following the normal movement rules for that Region.
If a character chooses to press on, he does not roll a die for movement, but instead follows the instructions on his
space, which are detailed as follows:
Rat Queen's Lair
Each Enemy encountered within the Rat Queen's Lair with "Rat" in its title adds 1 to its Strength during battle.
Wraith Lord's Domain
Each Spirit encountered within the Wraith Lord's Domain adds 1 to its Craft during psychic combat.
Encounters in Realms
A character in a Realm cannot encounter other characters but must follow the instructions on his space.
Rat Run and Skull Passage
When a character encounters Rat Run or Skull Passage, he draws two cards from the Bridge deck and adds them to his space. When his turn ends, he takes all cards on the space and shuffles them into the Bridge deck. When a character on Rat Run or Skull Passage chooses to press on, he moves one space across the bridge; either from Rat Run to Skull Passage, or from Skull Passage to Rat Run.

Example: The Tavern Maid begins her turn on Skull Passage. She may choose to either escape or press on. If she decides to press on, she moves one space to Rat Run (A). If she decides to escape, she rolls for movement and moves that many spaces out into the Dungeon (B).
Old Sewers and Catacombs
When a character enters the Old Sewers or the Catacombs, he immediately takes the top three cards of the Tunnel deck and places them in a facedown stack in front of him.
When a character on the Old Sewers or the Catacombs chooses to press on and has any cards remaining in his stack, he encounters the top card of his stack (turning it faceup if it is facedown). When a character on the Old Sewers or the Catacombs chooses to press on and has no cards remaining in his stack, he moves forward one space following the arrow; from the Old Sewers to the Rat's Nest, or from the Catacombs to the Throne Room.
A character cannot encounter Adventure cards on the Old Sewers or Catacombs while he has cards remaining in his stack. After a character encounters and removes the last card in his stack, he then encounters all cards on his space before ending his turn.
When a character on the Old Sewers or Catacombs chooses to escape, or otherwise leaves his space, he discards all Tunnel cards remaining in his stack.
Rats Nest
When a character encounters the Rat's Nest, he cannot take any Objects on the space and instead fights the Rat Queen in battle. The Rate Queen cannot be evaded and Followers, Spells, or Objects cannot fight in the character's place. The Rat Queen has a Strength of 3 and adds 1 to her Strength during battle for each Object on the Rat's Nest.
If a character defeats the Rat Queen, he takes one Object of his choice from the remaining Objects on the Rat's Nest and then teleports to any space in the Outer Region. If a character is defeated by the Rat Queen, he must ditch one of his Objects at random (in addition to the loss of life). If the result is a stand-off, or if the character is defeated, he moves to Rat's Road in the City and ends his turn.
Throne Room
When a character encounters the Throne Room, he cannot take any Treasure cards on his space and instead fights the Wraith Lord in psychic combat. The Wraith Lord cannot be evaded and Followers, Spells, or Objects cannot fight in the Character's place. The Wraith Lord has a Craft of 4 and adds 1 to his Craft during psychic combat for each Treasure card on the Throne Room.
If a character defeats the Wraith Lord, he takes one Treasure of his choice from the remaining Treasure cards on the Throne Room and then teleports to any space in the Outer Region. If a character is defeated by the Wraith Lord, he loses 1 Craft (in addition to the loss of life) and places one random card from the Treasure deck faceup on the Throne Room. If the result is a stand-off, or if the character is defeated, he moves to the Hall of Darkness in the Dungeon and ends his turn.
Bridge and Tunnel Cards
Special abilities and effects that apply to Adventure cards also apply to Bridge and Tunnel cards, but only after they have been drawn and placed on the board. When a Bridge or Tunnel card is discarded, it is shuffled back into its corresponding deck.
Terrain Cards and Tokens Within Realms
Terrain cards, Spell cards, and tokens (Fireland tokens, Dragon Scales, character tokens, etc.) cannot be placed on
Realm spaces. Ignore any effect that would place tokens on a Realm space.
Spells and Other Effects
Each Realm counts as a separate Region for the purpose of the Command Spell, Spell cards, and other effects
that affect characters depending on their Region.
Traps
Some cards feature the Trap keyword printed above the card's effect. A character cannot use special abilities or effects to ignore or avoid encountering Traps, unless the special ability or effect specifically states that it is effective against Traps.
The Realm of Souls
Death is no longer the end! Ghosts of fallen heroes wander a strange realm in search of the way back to their mortal form.
In The Realm of Souls, characters are given a second chance when they have been killed. As they wander in a haze of fear and horror through the eerie mists of the Realm of Souls, they will encounter the unimaginable terrors of the world beyond death.
The Realm of Souls expansion for Talisman: Digital Edition features new characters, Adventure and Spell Cards, plus two Alternative Endings as well as a new deck of cards to explore called Veil Cards. These cards contain the many creatures and encounters that characters can discover in the afterlife.
Components:
• 6 Adventure Cards
• 3 Spell Cards
• 70 Veil Cards
• 3 Terrain Cards
• 2 Alternative Ending Cards
• 3 Character Cards
• 3 Character Figurines
• 6 Ghost Character Cards
• 6 Ghost Figurines
• 6 Gravemarker Figurines
Death
When characters are killed and The Realm of Souls expansion is in use, their Character Card is replaced by a Ghost Character Card and the character is now a Ghost. Ghosts start with zero lives.
If a Ghost character has zero lives and must lose a life, they ditch any Objects, Followers and Gold on their current space and discard all Spells. They are then removed from the game.
When a character becomes a Ghost, they leave behind a Gravemarker on the space where they died. If a character becomes a Ghost whilst in the Inner Region, their Gravemarker is placed on the Portal of Power space (leaving all Objects and Followers behind as normal.)
Resurrection
If a Ghost character is instructed to Resurrect or return to their Gravemarker whilst they have greater than zero lives then they are Resurrected. Their original Character Card is returned and the player resumes play as their Character, continuing the game with the number of lives they had at the time of Resurrection. Their Gravemarker is then removed from the board.
When Resurrecting, Objects, Followers and Gold are ditched on the character’s space.
Ghost Character Movement
The Ghost Character may freely pass the Sentinel space. The Ghost Character cannot pass the Portal of Power to enter the inner region but may leave the Inner region through it.
The Ghost Character may enter and leave expansion regions, such as the Dungeon, according to the normal rules for a character entering and leaving those expansion regions.
A Soulbound card
Soulbound
Cards that are Soulbound have a spectral overlay across the card. A Soulbound card is kept in your inventory when becoming a Ghost or when resurrecting.
Veil Cards
Veil cards are not Adventure Cards and as such, cannot be encountered unless instructed otherwise.
Terrain Cards
As the world draws closer to its end, the land irrevocably shifts and changes. Certain game effects instruct players to place a Terrain card on a space of the game board. While a Terrain card is on a space, the text and name of that space is ignored and the text and name of the Terrain card is used instead. If an effect refers to a space that is no longer on the board because that space contains a terrain card, that effect is ignored.
For example, if the Temple space contains a “Chasm” Terrain card and a “6” is rolled at the Tavern, the effect of moving to the Temple is ignored. Terrain cards can only be removed by effects that specifically remove Terrain cards. Players cannot place Terrain cards on spaces in the Inner Region. If an effect instructs a player to place a Terrain card where he cannot, he ignores that effect.
If an effect causes a player to place a Terrain card on a space and there are no cards of the required type left in the Terrain deck, he must choose a Terrain card of that type on the board and move it to that space. If a player places a Terrain card on a space that already contains a Terrain card, he removes the original Terrain card from that space and returns it to the Terrain deck.
If a player places a new character on the game board, he ignores any Terrain cards when placing that character.
Cursed Cards
Some Objects and Followers have been twisted and tainted by dark powers and have the Cursed keyword. Cursed Objects and Followers must be taken by a character encountering them (even if the character is at his Object Carrying Limit) and cannot be ditched.
When a character has more Objects than his Carrying limit, and must decide which Objects to keep, a character must choose to keep as many Cursed Objects as possible. A character can only choose not to keep a Cursed Object if he has more Cursed Objects than his Carrying limit.
Cursed Objects and Followers may be discarded, stolen, and sold as normal.
Alternative Rules
Life Trophy - Instead of discarding trophies acquired as a Ghost character, they are kept as normal but they may only be traded in for lives instead of Strength/Craft.
Random Breach - Start the game with the 3 Breach Terrain Cards randomly in the Middle/Outer Region.
The Ancient Beasts
Putting a Beast Into Play
When putting a Beast into play draw from the top of the Ancient Beast deck. The drawn Beast will be placed onto their starting space as found on their card.
If the starting space can apply to multiple spaces currently on the board then one is chosen at random.
Movement
At the end of a round if a Beast has any instructions for movement listed they will be applied in the order the Beasts entered the board. If a Beast is moving towards something on the board and nothing currently meets those conditions the Beast does not move.
Some movement instructions apply when a condition has occurred on the board. In these cases the movement instructions will be applied when the condition occurs and will not be applied at the end of a round.
Beasts cannot move towards the Inner Region and anything inside of it will be ignored by the Beasts.
Effects
Instructions on a Beast’s card must be followed for as long as that Beast is in play.
Apex
Some Beasts have an Apex effect. Apex effects will cause every player to lose the game if achieved by the Beast.
Encountering a Beast
Beasts must be encountered on any space they are on if they have Strength and/or Craft. After a Beast has been successfully encountered, then defeated or evaded, you may continue on to encounter the space.
If a Beast has Strength and Craft you may choose which you use to fight the Beast. If the Beast doesn’t have Strength/Craft it is not encounterable and cannot be fought.
Defeating a Beast
When a Beast is defeated in battle or psychic combat it is “Weakened.” Follow any instructions for effects that apply when it is defeated.
Beast Rewards
When a Beast is defeated, players are often rewarded with Beast Rewards. These cards are not considered Objects, Spells, or Followers. Therefore, they cannot be ditched, stolen, sold, or traded. Characters may gain any number of Beast Rewards during the game.
If a Beast Reward is awarded to a player, but is not currently in the Beast Rewards deck due it to already being claimed, that player takes it from the player that currently has it.
When a character is killed and the dead character's player draws a new character, all Beast Rewards owned by the dead character are carried over to the new character and may be used normally by them.
Weakening
When a Beast is weakened it will lose 1 life. If a Beast is weakened and has no life left it will be killed.
Killing
Follow any instructions for effects that apply when it is killed. Then remove the Beast from the game.
The Clockwork Kingdom
Materials
Material cards are drawn from the Material deck.
In their natural state as raw Materials, they are inert and have no special effects. They only become useful when crafted into an Invention.
Inventions
Creating an Invention
Inventions are blank object cards which are created when crafting Materials together.
At the end of a character’s turn, they may discard any 3 Materials from their inventory in order to create an Invention and add it to their inventory. The newly formed Invention will combine various effects from all of the Materials used in the inventing process.
If materials have effects which apply similar or identical text, they may be combined together and their effects will be compounded (see compound effects).
Ditching, Discarding and Dismantling Inventions
If an Invention would be ditched or discarded, it is removed from the game instead.
When instructed to dismantle an Invention, remove it from the game unless an ability or effect prevents it.
Transference of Properties
All Materials are Trinkets, but Inventions are not trinkets by default.
Some Materials are Magic Objects, if an Invention is created using at least 1 Magical Material, the Invention is considered to be a Magic Object as well.
Compound Effects
Weapon example: an Invention that has
“Weapon Add 1 to your Strength during battle.” and
“Weapon Add 2 to your Strength during battle.” will become
“Weapon Add 3 to your Strength during battle.”
Armour example: an Invention that has
“Armour If you are defeated in battle and just lost a life, roll 1 die. If you roll a 6+ this card protected you and you did not lose that life, though you still lost the battle.” and
“Armour If you are defeated in battle and just lost a life, roll 1 die. If you roll a 5+ this card protected you and you did not lose that life, though you still lost the battle.” will become
“Armour If you are defeated in battle and just lost a life, roll 1 die. If you roll a 4+ this card protected you and you did not lose that life, though you still lost the battle.”
Harmonies

Some Materials include the keyword Harmony. It will be followed by the names of one or more Material cards, then a separate effect. If the card names listed match with any of the other Materials being combined together when creating an Invention, the text underneath the Harmony will be used instead of the cards’ standard effect.
Example:
Ent Wood’s Harmony happens when combined with Wood.
If an Invention was created using Wood, and Ent Wood, it would add the effect of ‘Add 3 to your craft during psychic combat.’ to the invention.
The standard effect of ‘Add 1 to your craft during psychic combat.’ would be ignored.
Trinkets
Some Objects feature the Trinket keyword printed above the card’s special ability.
Trinkets are treated in all respects like normal Objects, except they do not count towards a character’s carrying capacity. A character may have four normal Objects in addition to any number of Trinkets. Trinkets may be ditched, discarded, stolen, or sold like normal Objects.
FAQ & Errata
The following are the frequently asked questions, errata and clarifications for Talisman.
Rules clarifications
Crossing Regions
Characters may cross the Sentinel and Portal of Power even if there is a card on the space, unless the card specifically states otherwise (such as the Barrier Spell and Cerberus card). Characters may not encounter a card on the Sentinel or Portal of Power unless they end their movement on the space following the normal rules.
Attacking More Than One Enemy
If a character fights one or more Enemies at the same time (see “More Than One Enemy”, any Spells, special
abilities, or effects that target one creature only affects one Enemy. The character chooses which Enemy is affected.
Example: A character lands on a Cave Troll and a Goblin. Since both Enemies attack with Strength and have the same encounter number, they fight as one during the battle. The character casts the Destruction Spell which allows him to remove any faceup Adventure Card from the board and place it on the discard pile. Since the Cave Troll is a dangerous Enemy, the character chooses to discard it with the Destruction Spell. The character then resolves a battle with the Goblin.
Some Enemies have effects that turn the battle or psychic combat into a stand-off or automatically defeat a character. These effects apply to the entire battle or psychic combat, not just the individual Enemy.
Example: A character lands on a Cave Troll and a Goblin. Since both Enemies attack with Strength and have the same encounter number, they fight as one during the battle. The character wins the battle but must now roll a die for the Cave Troll’s special ability to see if it regenerates. The characters rolls a “1” result which means the Cave Troll regenerates and the attack counts as a stand-off instead. In this case, neither the Cave Troll nor the Goblin can be taken as a trophy since the Cave Troll’s ability turned the battle into a stand-off.
Encounter Sequence
When characters choose to encounter a space, they must resolve the encounter in the order listed below. If a character is moved to a different space any time during the encounter, he continues with a new encounter in the new space. Exception: If a character is defeated during a battle or psychic combat and is forced to move to a new space (losing to the Lord of Darkness for example), he cannot encounter the new space and his turn immediately ends.
1. If the space has instructions to draw cards (see “Encountering A Space – Draw Cards Spaces”), the character must follow the instructions on the space first.
2. Any cards in the space without an encounter number (such as the Hex Spell) must be encountered.
3. Any Events in the space must be encountered. Note that an Event that lasts more than one turn remains on the space as a reminder, and still counts as a card on that space. If a character encounters the Event again, the effect does not “reset” and last for additional turns.
4. Any Enemies in the space with an encounter number of 1 must be encountered. If all of the Enemies are killed or
evaded the character continues to the next step, otherwise his turn ends.
5. Any Enemies in the space with an encounter number of 2 must be encountered. If all of the Enemies are killed or evaded the character continues to the next step, otherwise his turn ends.
6. Any Enemies in the space with an encounter number of 3 must be encountered. If all of the Enemies are killed or evaded the character continues to the next step, otherwise his turn ends.
7. Any Strangers must be visited.
8. Any gold, Followers, and Objects may be taken.
9. Any Places must be visited.
10. If the space does not have instructions to draw cards, the character must follow the instructions for the space.
Followers That You Must Take
Some Followers (such as the Poltergeist and Hag) state that they must be taken. All of the rules regarding Followers apply to these cards as well, except a character must take the Followers if he encounters them and cannot choose to ditch them (see “Ditching Followers and Objects”). However, there are other ways for characters to get rid of these pesky companions, such as visiting the Chasm in the Middle Region.
Cards That Become Followers
Some cards and special abilities allow characters to take cards as Followers even if the card type is not actually listed as a Follower. For example, the Minstrel’s special ability allows him to charm Animals into joining him as Followers. A character that has these Followers in his play area treats them as normal Followers in all regards, except he cannot choose to ditch them. If another character has an ability that affects Followers, he cannot target a card that has become a Follower.
Example: A character cannot cast Mesmerism to take one of the Minstrel’s charmed Animals because it is only considered a Follower to the Minstrel.
If a character is forced to ditch or leave a card that has become a Follower (such as the Cell space in the Dungeon, getting turned into a Toad, or because the character is killed), the Follower must be discarded instead.
Cards That Fight In Your Place
Cards that fight in a character’s place offer all of the normal rewards without any of the risks for losing the attack, as described below.
Fight In Your Place Vs. Characters
If a card fights in a character’s place and wins a battle or psychic combat against a character, the winning character may claim a reward as normal such as taking an Object, gold, or forcing the opposing character to lose a life.
If a card fights in a character’s place and loses a battle or psychic combat against a character, the winning character may not claim a reward.
If both characters have a card fight in their place, then neither character may claim a reward.
Fight In Your Place Vs. Creatures
If a card fights in a character’s place and wins a battle or psychic combat against a creature, the character may still receive rewards as normal such as taking killed Enemies as trophies, unless otherwise stated on the card.
If a card fights in a character’s place and loses a battle or psychic combat against a creature, the character does not lose a life or suffer any other effects. However, the character’s turn still immediately ends after the fight is resolved.
Example: A character encounters the Succubus and casts the Summon Stormcrow Spell to have the Stormcrow fight in his place. The Stormcrow loses the attack, and the character’s turn immediately ends. However, the character does not lose a life, nor does he lose a Craft counter or place a Craft on the Succubus.
Spell Targets
Characters cannot cast Spells unless the Spells have a valid target. Characters may not discard Spells just to get rid of them.
Example: A character has the Mesmerism Spell which allows him to take a Follower from another character. If none of his opponents have any Followers, he cannot cast Mesmerism just to get rid of the Spell because there are no valid targets available.
Movement Effects
Some cards, effects, and even certain Regions modify or replace a character’s movement. Most of the Spells and special abilities that characters use to modify their movement feature one of the following phrases:
• “Instead of rolling the die for movement”
• “Instead of moving normally”
Instead of Rolling the Die for Movement
In order for a character to use a movement effect with the phrase “instead of rolling the die for movement,” the character must be able to roll a die following the normal rules for movement. If the character cannot roll a die following the normal rules, the character cannot use the movement effect.
Example: A character has the Poltergeist Follower which slows his movement to 1 space per turn. The character
cannot cast the Teleport Spell, which has the wording “instead of rolling the die for movement,” because he
automatically moves 1 space instead of rolling the die for movement.
Instead of Moving Normally
As long as a character is able to move, even under special conditions, he may use a movement effect with the wording “instead of moving normally.”
Example: The Cloak of Feathers states “Instead of moving normally, you may discard the Cloak of Feathers to teleport to any space in the same Region.” A character in the Inner Region may use the Cloak of Feathers to move to the Crown of Command because the Cloak of Feathers has the wording “instead of moving normally.”
If a character cannot move or must test to see if he is able to move (such being Enslaved at the Temple, for example), he cannot use any movement effects. Note that characters on the Crown of Command do not move and therefore cannot use any movement effects.
Discarding at Random
The following suggestions may be used when an effect or encounter forces you to discard cards at random:
• If all of your cards have the same card back, simply shuffle the cards and hold them out facedown. Then have the
player to your left take one of the cards at random to discard.
• If you have 6 or fewer cards, simply line them up and roll a die. Then count from the left-most card until you reach the number rolled on the die.
Example: A character rolls a “5” result so the fifth card in the line is discarded.
• If the cards contain a mix of different card backs, such as cards from the Adventure and Purchase deck, count the total number of cards that need to be randomised and shuffle them in a stack under the table. The player to your left calls out a number between 1 and the total number of cards that need to be randomised. Then count down, starting with the top card of the stack, until you reach the number called out by the player. This is the card that must be discarded.
Example: A character has eight Objects, one of which must be discarded. He takes the eight cards and shuffles them facedown under the table. The player to the left called out the number 3. The player then takes the 3rd card from the top of the stack and discards it.
Simultaneous Effects
If two or more abilities or effects are triggered at the same time, the player who is currently taking his turn decides the order to resolve them in.
Example: The Hex Spell states that any character who lands on it must lose 1 life. The Druid’s special ability states that he may gain his full complement of Spells whenever he lands on the Woods. If the Druid lands on a Woods space with the Hex Spell, he decides if he loses a life first or if he gains Spells first.
Q&A
Board spaces
City
Q: When a character encounters the City, can he choose an option that cannot be fulfilled, like visiting the Doctor if he already has life counters equal to his life value? What about the Village?
A: No. If a character visits the Doctor, he must spend at least 1 gold to heal, and only if he has fewer life counters than his life value. If a character visits the Alchemist, he must turn at least one of his Objects into gold. If he is not able to fulfil any of these conditions, he must visit the Enchantress. If a character encounters the Village, he must choose an option that he is able to fulfil; otherwise he must visit the Mystic.
Crown of Command
Q1: Can a character on the Crown of Command pick up gold, Objects, and Followers there?
A: Yes, as long as there are no other characters on the space. If there any other characters on the Crown of Command, the character there must be encountered instead of encountering the space. If there are no other characters on the Crown of Command, the character encounters any cards on the space following the normal rules (see “Encounters”).
Q2: When a character encounters another character on the Crown of Command, does he have to attack the character or can he use one of his special abilities on the other character as his encounter?
A: The character may to choose to either attack or use one of his special abilities on the character.
Q3: Can a character cast the Command Spell even if his Craft is lower than 3?
A: Yes.
Q4: Can a Toad cast the Command Spell?
A: No.
Q5: Can a character on the Crown of Command cast the Temporal Warp Spell?
A: Yes.
Cursed Glade
Q: Do the instructions on the Cursed Glade still affect a character landing there, even if he chooses to encounter
another character there instead of the space?
A: No. The instructions on the Cursed Glade only affect a character encountering the space. Note that the Plain of Peril requires a character to have a Talisman before he lands on the space. Even if a character encounters another character on the Plain of Peril, he must still have a Talisman to enter the space.
Desert
Q: If a character lands on the Desert and he chooses to encounter another character there instead of the space, does he still lose a life?
A: No.
Ruins
Q: Can a character ditch an Object or Follower after drawing the first card to avoid drawing the second card?
A: Yes. Remember, however, that if a character ditches Objects or Followers he cannot take them back during the same turn.
Tavern
Q1: If a character rolls a “3” in the Tavern and does not have any gold, does he suffer any penalty?
A: No.
Q2: If a character rolls a “5” in the Tavern, he may choose to teleport to any other space in the Outer Region as his next move. If the character has to miss his next turn, can he still teleport when he next has a move?
A: Yes.
Temple
Q1: If a character rolls a “5” in the Temple while he is a Toad, does he still roll a die to break free from enslavement?
A: Yes. If he breaks free, he must then move 1 space.
Q2: If a character rolls a “10” in the Temple and does not want to take the Talisman, does he have to leave it faceup
on the space?
A: Yes.
Warlock’s Cave
Q1: When a character completes a warlock quest and teleports to the Warlock’s Cave to receive the reward, can he
accept another quest or encounter a character that he lands on?
A: No. Once a character is teleported to the Warlock's Cave and gains a Talisman or Reward, his turn ends; he cannot encounter the space or any character in the space.
Q2: If a character is on a warlock quest and gains a Talisman, does he still have to complete the quest?
A: Yes.
Q3: Can a character teleport to the Warlock’s Cave when he completes a warlock quest even if the Blizzard Event is in effect?
A: Yes.
Q4: If a character has accepted a warlock quest and is killed, does he lose the quest?
A: Yes.
Character cards
Assassin
Q1: Can the Assassin assassinate any creature, regardless of whether or not it is drawn from the Adventure deck or
already faceup on the space when he encounters it?
A: Yes.
Q2: Can the Assassin still assassinate if he fights two or more Enemies at the same time during battle?
A: Yes.
Druid
Q1: If the Druid draws an Event which affects alignment, can he immediately alter his alignment to gain benefit
from the card?
A: Yes.
Q2: Can the Druid immediately gain his full complement of Spells when he lands on the Woods before he resolves any encounter there?
A: Yes.
Minstrel
Q1: If the Minstrel fails to charm an Animal, does it attack him?
A: No.
Q2: If the Minstrel fails to charm an Animal, can he then choose to attack the Animal?
A: No.
Q3: The Minstrel draws a Dragon and an Object in the Ruins. If the Minstrel does not attack the Dragon, does it
count as evading so he can take the Object?
A: No. Choosing not to attack an Animal or Dragon does not count as evading. If there are any Enemies on the space and the character did not kill or evade them all, then he may not take any Objects on the space.
Sorceress
Q1: If the Sorceress attempts to beguile a character that she lands on, can she also attack the character?
A: No. When a character encounters another character he may either attack or use one of his special abilities on the character.
Q2: If the Sorceress attempts to beguile a character and she fails, can she then attack the character?
A: No.
Adventure cards
Amulet
Q1: The Amulet states “No Spells will affect you, other than the Command Spell.” Does this also imply that a character’s Objects, Followers, Spells, and gold are unaffected by Spells if he has the Amulet?
A: Yes.
Q2: Can a character cast the Invisibility Spell to evade a character who has the Amulet in his possession?
A: Yes.
Fountain of Wisdom
Q: Can a character encounter the Fountain of Wisdom the same turn that he draws it from the Adventure deck?
A: Yes. This also applies to the Magic Stream, Pool of Life, and other similar encounters.
Ghost
Q: If the Ghost appears on the space where a character draws it, does he encounter it that turn?
A: Yes.
Hermit
Q: If the Hermit appears on the space where a character draws it, can the character gain a Talisman if he encounters him that turn?
A: Yes.
Orb of Knowledge
Q1: If the Philosopher chooses to replace a faceup Adventure Card, can he use the Orb of Knowledge to replace the new card that he draws?
A: Yes.
Q2: If the Prophetess chooses to replace a faceup Adventure Card, can she use the Orb of Knowledge to replace the new card that she draws?
A: Yes.
Q3: If a character uses the Orb of Knowledge to draw a replacement card, can he cast the Invisibility Spell to evade the newly drawn card?
A: Yes.
Prince / Princess
Q: Can a character use the Prince or Princess to heal up to 2 lives for free at the Castle and then exchange the Follower for 3 gold during the same turn?
A: Yes.
Raft
Q1: If a character acquires a Raft, does it count towards his carrying limit?
A: Yes. When a character builds or acquires a Raft, he must keep it as an Object until the start of his next turn.
Q2: If the Thief lands on another character who has acquired a Raft, can he steal it? If so, when can he use the Raft?
A: Yes. The Thief may use the Raft at the start of his next turn, instead of moving normally. Whether or not the Raft is used, it must be placed on the Adventure Card discard pile or back with the Purchase deck after the character has either used it or decided not to do so.
Runesword
Q: If a character uses the Runesword to defeat another character in battle and force him to lose a life, does the character still gain a life if his opponent prevents the loss of life with Armour or the Preservation Spell?
A: No.
Wand
Q: The Wand states “You may always have at least one Spell if your Craft allows (gain a Spell each time you cast your last Spell).” The Wizard already has the same special ability to always have at least one Spell. If the Wizard has the Wand, does he always have at least two Spells or only one Spell?
A: Only one Spell.
Spell Cards
Counterspell
Q1: Can a character cast Counterspell on one of his own Spells to negate its effects?
A: Yes.
Q2: Can a character cast Counterspell to negate the effects of the Command Spell or the Random Spell after the player has already rolled the die?
A: No. Counterspell must be cast before the die is rolled.
Destroy Magic
Q1: If Destroy Magic is in effect, can a character still cast the Command Spell?
A: No.
Q2: If the Destroy Magic Spell is in effect, can a character with a Talisman still enter the Plain of Peril?
A: Yes.
Destruction
Q1: If a character just completed his move on a “Draw 1 Card” space and casts the Destruction Spell on a card in his space, does he have to draw another Adventure Card?
A: Yes, but only if he chooses to encounter the space.
Q2: If a character is on the main game board, can he cast the Destruction Spell on a card in the Dungeon Region?
A: Yes.
Healing
Q: Can a character cast the Healing Spell when he loses his last life?
A: No. A character must have at least one life remaining in order to heal or gain life.
Nullify
Q1: Can a character cast the Nullify Spell on himself?
A: Yes, as long as you have at least one Spell at the time that Nullify is cast.
Q2: Can a character cast the Nullify Spell on a character who does not have any Spells?
A: No.
Psionic Blast
Q1: If a character casts the Psionic Blast Spell while fighting the Pit Fiends, does it only affect a single battle against one of the Pit Fiends?
A: Yes. Each Pit Fiend is considered a separate battle.
Q2: Can the Monk use his inner belief to add his Craft value to his Strength during battle and then cast the Psionic Blast Spell to add his Craft value to his Strength again during the same battle?
A: Yes.
Teleport
Q: If the Teleport Spell is cast and another character casts Counterspell to negate its effect, can the character then roll a die for his movement instead?
A: Yes.
The Reaper Expansion
character cards
Dark Cultist
Q1: If the Dark Cultist defeats another character in battle and forces him to lose a life, does she still receive a gift from the Forces of Darkness if the loss of life is prevented with Armour or the Preservation Spell?
A: No.
Q2: If two Enemies with the same encounter number fight as one during battle or psychic combat, does the Dark Cultist receive two gifts from the Forces of Darkness if she kills them both or only one gift?
A: Only one gift.
Knight
Q: If the Knight lands on the same space as the Druid with an evil or neutral alignment (or an evil or neutral character with the Druid Staff) and declares that he is attacking him, can the other character evade the Knight by changing his alignment to good?
A: No. Once the Knight declares that he is attacking the character, changing alignment to good has no effect on the attack. However, the Druid can change his alignment when the Knight ends his movement, before the Knight announces whether he is going to encounter the space or a character in the space.
Sage
Q: If the Sage gains a Spell at the start of his turn, can he cast that Spell during the same turn?
A: Yes.
Grim Reaper
Q1: If a character uses the Riding Horse to determine his move, does the Grim Reaper move if a “1” is rolled on either
die?
A: No. When a character uses the Riding Horse, his move is the sum of both dice. The Grim Reaper only moves when a character rolls a natural “1” on a single die.
Q2: If the Amazon uses her special ability to roll two dice for her movement and chooses one of the results to use, does
the Grim Reaper move if she rolls a “1” on either die?
A: The Amazon may move the Grim Reaper only if she chooses to use the “1” result for her movement.
Q3: If a character pays a fate token to reroll his movement, does the Grim Reaper move if he rolls a “1” for his reroll?
A: Yes. This is still considered a natural roll because the result was not obtained by adding bonuses or subtracting penalties.
Q4: If a character rolls a “1” for his move but then pays a fate token to reroll the die, does the Grim Reaper still move?
A: Only if the reroll is a “1” result.
Q5: If a character rolls a “5” for the Grim Reaper, can he teleport to a different Region?
A: Yes. The Grim Reaper can cross Regions when teleporting. However, the Grim Reaper may never teleport to the Inner Region.
Q6: Can the Grim Reaper enter the Dungeon?
A: Yes. The Grim Reaper may enter and leave the Dungeon Region according to the normal rules for a character entering and leaving the Dungeon, with the following exception: When the Grim Reaper reaches the Treasure Chamber space, he must immediately move to any space in any Region (except the Inner Region) and end his movement in that space. The player who moved the Grim Reaper chooses which space he is moved to.
Adventure cards
Academy
Q: If a character encounters the Academy, can he pay 6 gold and miss 2 turns to gain 1 Strength and 1 Craft?
A: Yes.
Cerberus
Q1: If Cerberus is on the Portal of Power, does a character have to land exactly on the Portal of Power to be able to
fight Cerberus or is it treated it like crossing from the Middle Region to the Inner Region and then fight him on the way through?
A: A character must land exactly on the Portal of Power to be able to attack Cerberus. If Cerberus is killed, the character may attempt to cross the Portal of Power on his next turn following the normal rules, if he so chooses.
Q2: If a character casts the Displacement Spell on Cerberus and moves the card to another space, does the character still have to defeat Cerberus before he is allowed to enter the Portal of Power?
A: No. Cerberus is no longer guarding the Portal of Power if this occurs.
Q3: If a character defeats the Lord of the Pit, can he still teleport to the Plain of Peril even if Cerberus is guarding the Portal of Power?
A: Yes. Cerberus only prevents a character from entering the Inner Region through the Portal of Power doorway.
Concealed Pouch
Q1: Is the Concealed Pouch, or the Object stored inside, affected by the Whirlwind or the Gust of Wind, Shatter, or
Transmute Spells?
A: Yes.
Q2: If a character loses the Concealed Pouch, does he also lose also any Objects that are inside the Pouch?
A: If a character loses the Concealed Pouch, any surplus Objects that the character cannot carry must be ditched in his space. The character chooses which of his Objects are ditched, if any.
Q3: Can the Merchant trade an Object with another character and take the Concealed Pouch from him or the Object stored inside?
A: No.
Earthquake
Q: If a character draws the Earthquake along with another Adventure Card, is the other card also affected by the
Earthquake?
A: No. The Earthquake only affects cards which are already faceup on the board when it is drawn.
Ekor
Q: The Ekor is on a space with another Enemy that has the same encounter number, so they fight together during battle. If a character with Strength higher than 2 encounters them, does the Ekor still flee 1 space clockwise instead of fighting?
A: Yes.
Fiend Slayer
Q1: A character has the Fiend Slayer and lands on a “Draw 1 Card” space with a faceup Adventure Card already there. Does the character have to draw another Adventure Card if he encounters the space?
A: Yes.
Q2: If the Fiend Slayer is your Follower and the Prophesy Event is in effect, do you have to draw 2 more cards than required?
A: Yes.
Q3: Can a character choose not to use the Fiend Slayer's ability and only draw 1 card?
A: No. While the Fiend Slayer is a character’s Follower, the character must draw one more card than required. If the character does not want to draw one more card than required he must ditch the Fiend Slayer.
Genie
Q1: Are the Genie’s Spells affected by the Magical Vortex or the Nullify Spell?
A: No.
Q2: Can the Genie cast his Spells if you have the Amulet or the Destroy Magic Spell is in effect?
A: No.
Q3: Can the Prophetess look at the Genie’s Spells?
A: No.
Q4: If the Genie is ditched on a space, does he keep his Spells or must they be discarded?
A: The Genie keeps his Spells. If a character takes the Genie as a Follower on a following turn, the Genie may only cast his remaining Spells; the Genie does not draw additional Spells to take his total to 3.
Q5: Can a character use the Genie to cast Spells even if his Craft is lower than 3?
A: Yes.
Q6: Do Spells cast by the Genie count against a character’s Spell limit?
A: No. Note that the phrase “treat the Spells as though you had cast them” is only taken into account if an effect refers to a character who cast the Spell (such as the Reflection Spell).
Goblin Trapsmith
Q1: If a character fights the Goblin Trapsmith and the Trapper together during the same battle, does the character still roll a die for his attack roll?
A: No. The effect of the Trapper overrides that of the Goblin Trapsmith.
Q2: If a character fights the Goblin Trapsmith and the Goblin Sniper together during the same battle, does the character still roll a die for his attack roll?
A: No. The effect of the Goblin Sniper overrides that of the Goblin Trapsmith.
Q3: Can the Warrior use his special ability when he fights the Goblin Trapsmith?
A: No. The Warrior must roll two dice for his attack roll and use the lowest result.
Haunt
Q: If a character has both the Haunt and Jester as Followers, are his attack rolls reduced by 2 instead of 1?
A: Yes.
Idol
Q: If a character is enslaved by the Idol and the card is moved or discarded, is he still required to break free from the enslavement?
A: No. The character is automatically set free if this occurs.
Leper
Q: Can the Leper move multiple times during a single turn?
A: Yes.
Prophesy
Q: If a character encounters a “Draw 1 Card” space when Prophesy is in effect and there is a faceup Adventure Card already there, does the character have to draw another Adventure Card?
A: Yes.
Staff of Mastery
Q: Can a character use the Staff of Mastery to enslave the Doppelganger?
A: Yes. When the Doppelganger is enslaved, it has same total Strength as the opponent the character attacks in battle. The character then adds the Doppelganger’s Strength to his own Strength.
Warhorse
Q: If a character is defeated in battle but prevents the loss of life with Armour or the Preservation Spell, does he still have to discard the Warhorse?
A: No.
Spell Cards
Enchant Blade
Q: Can a character cast the Enchant Blade Spell on a Weapon that is already a Magic Object?
A: Yes.
Fireball
Q: If a character kills an Enemy with the Fireball Spell, can he take the Enemy as a trophy?
A: Yes.
Misdirection
Q: Can a character cast the Misdirection Spell on a character in the Inner Region?
A: Yes, but Misdirection may not be cast on a character on the Crown of Command or a character who is turning back. The player who cast Misdirection on a character in the Inner Region can either move his opponent forward to the next space or back one space towards the Plain of Peril. If the player chooses to move his opponent back one space towards the Plain of Peril, the character does not encounter the space and this is not considered to be turning back. In this case, the character may continue advancing toward the Crown of Command on his following turn as normal.
Reflection
Q: Can a character cast the Reflection Spell to negate the effects of an Immobility Spell?
A: Yes.
Transference
Q1: Can a character cast the Transference Spell in the Inner Region, and if so, can you switch spaces with a character who is on the Crown of Command?
A: Yes to both. You do not need a Talisman to switch spaces with a character on the Crown of Command, but you must have a Talisman to switch spaces with a character on the Plain of Peril.
Q2: Can a character cast the Transference Spell on a character in the same space as him?
A: No.
The Dungeon Expansion
Character cards
Gladiator
Q1: Can the Gladiator “train” Followers that already add to his Strength in battle, such as the Colossus and Mercenary?
A: Yes.
Q2: Can the Gladiator “train” cards that become Followers, such as the Black Unicorn?
A: Yes.
Gypsy
Q: Can the Gypsy take a Spell from the discard pile if it was cast by the Genie or the Spell Ring?
A: Yes.
Swashbuckler
Q1: If the Swashbuckler defeats the Cave Troll in battle and it regenerates, can he still take an extra turn?
A: No.
Q2: The Swashbuckler wins a battle and takes an extra turn. He then wins another battle during the extra turn. Does the Swashbuckler gain yet another extra turn?
A: No. The Swashbuckler’s special ability should read “You may only do this once per round” instead of “once per turn.”
Dungeon Cards
Clockwork Owl
Q: Can a character use the Clockwork Owl during movement if he uses a Riding Horse or casts the Speed Spell?
A: No.
Dark Denizens
Q: Can the Prophetess use her ability if the Dark Denizens Event is in effect?
A: Yes. After the Prophetess draws a Dungeon Card, she may discard it and draw another Dungeon Card to replace it.
Goblin King
Q: If the Ghoul raises the Goblin King from the dead and uses him in battle, do other Goblins and Hobgoblins still add to the Goblin King’s Strength?
A: Yes.
Living Statue
Q: A character encounters the Living Statue and Cave Goblin. Both of the Enemies have the same encounter number, so the character fights them together in battle. If the character wins the battle without using a Weapon that is a Magic Object, does the attack still result in a stand-off?
A: Yes.
Tinker Imp
Q: Can the Tinker Imp discard a random Object that is inside the Bag of Holding or Concealed Pouch?
A: Yes.
Torch
Q: Can a character use the Torch to roll 2 dice for movement in the Hall of Darkness?
A: No.
Treasure Cards
Bag of Holding
Q: If a character with the Bag of Holding cannot use Magic Objects, such as being targeted by the Destroy Magic Spell or encountering the Cursed Glade space, does he lose any Objects that are inside the Bag?
A: Any surplus Objects that the character cannot carry must be ditched in his space. The character chooses which of his Objects are ditched, if any.
The Frostmarch Expansion
adventure cards
Lake of Visions
Q: If a character already has a Warlock Quest and visits the Lake of Visions, can he accept another Quest?
A: No
Trickster
Q1: If a character defeats the Trickster, can he take the Bag of Holding or Concealed Pouch, or an Object that is inside one of them?
A: Yes.
Q2: If a character defeats the Trickster and takes the Bag of Holding or Concealed Pouch from a character, what happens to the other Objects that are stored inside?
A: Any surplus Objects that the character cannot carry must be ditched in his space. The character chooses which of his Objects are ditched, if any.
Alternative Ending Cards
Warlock Quest
Q: If a character must discard his quests due to the False Grail or Glory Seeker, does he also discard his completed quests?
A: No. The facedown quests are only meant as a reminder of how many quests the character completed, they are not considered to be in play and ignore any effects regarding quests.
The Highland Expansion
character cards
Highlander
Q: If the Highlander charges into battle, does his turn end if he wins the battle?
A: No. When the Highlander charges, he continues his turn normally and then must miss his next turn.
Relic Cards
Arnkell
Q: Can a character in the Inner Region use the Arnkell to teleport to the Crown of Command space?
A: Yes.
Rage Talon
Q: If a character defeats another character in psychic combat, can he use the Rage Talon’s second ability so the character cannot use Armour to prevent the loss of life?
A: No, the Rage Talon can only be used in battle.
Windlord Amulet
Q: If a character defeats another character in battle, can he use the Windlord Amulet’s second ability so the character cannot use Armour to prevent the loss of life?
A: No, the Windlord Amulet can only be used in psychic combat.
Alternative Ending Cards
Hand of Doom
Q: If a character rolls a 2-5 result for the Hand of Doom, can he pick up gold, Objects, and Followers on the Crown of Command?
A: Yes, after the effects of the Hand of Doom have been resolved.
Highland Region
Precipice
Q: If cards are ditched on a Precipice space as a result of a character encounter, are they discarded at the end of the turn?
A: No. The instructions on the space are only followed if a character encounters the space, not another character in the space.
THE SACRED POOL EXPANSION
Character Cards
Chivalric Knight
Q: If the Chivalric Knight aids two characters during the same round, does he must miss 2 turns or only 1 turn?
A: 2 turns.
THE DRAGON EXPANSION
Dragon Tower
Q1: If a card or special ability affects an Enemy Dragon, can it be used during encounters on Enemy Dragons in the Dragon Tower?
A: Yes.
Q2: If a character in the Dragon Tower uses Arnkell or Cloak of Feathers to teleport instead of moving normally, does he move before or after he has finished resolving the Dragon Cards he encounters?
A: After.
Errata
Dragon Realm
The Covetous Dragon space should include the following text: “If you do not have any gold, lose 1 life instead.”
Dragon Cards
The Gilded Dragon text should replace “battle’ with “psychic combat.”